 How-To Tip
How to Design a Personal Productivity Workflow System (With Templates & Tool Stack)
Feeling overwhelmed by scattered tasks and tools? This guide teaches you how to design a personal productivity workflow using the input-process-output model. Learn to audit your inputs, choose a tool stack with the 'jobs to be done' framework, and protect your deep work time.
- workflow-automation
- time-management
- deep-work
- students
- freelancers
The Hidden Cost of Not Having a Personal Workflow
You sit down at your desk with a clear plan. Then a Slack notification pops up. You check it, reply, and notice an email about a deadline change. You open your notes app to jot down a thought that just hit you, but while you are there, you see a half-finished draft from yesterday. Forty-five minutes later, you have touched five different apps and completed exactly zero of the tasks you intended to do.
This pattern is not a discipline problem. It is a system problem. When your inputs — messages, tasks, ideas, documents — arrive in a dozen different places with no defined path, your brain spends its limited attention budget on deciding where to put things instead of actually doing them. The result is a constant low-grade cognitive load that leaves you feeling busy but unproductive.
The scale of this problem is larger than most people realize. According to data cited by Kissflow, 68% of employees have too much work to handle on a daily basis, a figure drawn from Cornerstone and McKinsey research. That statistic captures employees in structured roles with managers and defined responsibilities. For knowledge workers, freelancers, and students who manage their own priorities without organizational support, the overload is often worse because there is no one else to triage the inflow.
The good news is that you do not need to fix your willpower or adopt a rigid productivity philosophy. You need a personal workflow: a repeatable sequence of steps that moves every piece of incoming information from capture to completion through a deliberately chosen set of tools. This article walks through how to design one using the input-process-output model, a framework that sits above any single method like GTD or PARA and works regardless of which apps you prefer.
The Input-Process-Output Model: Your Workflow Blueprint
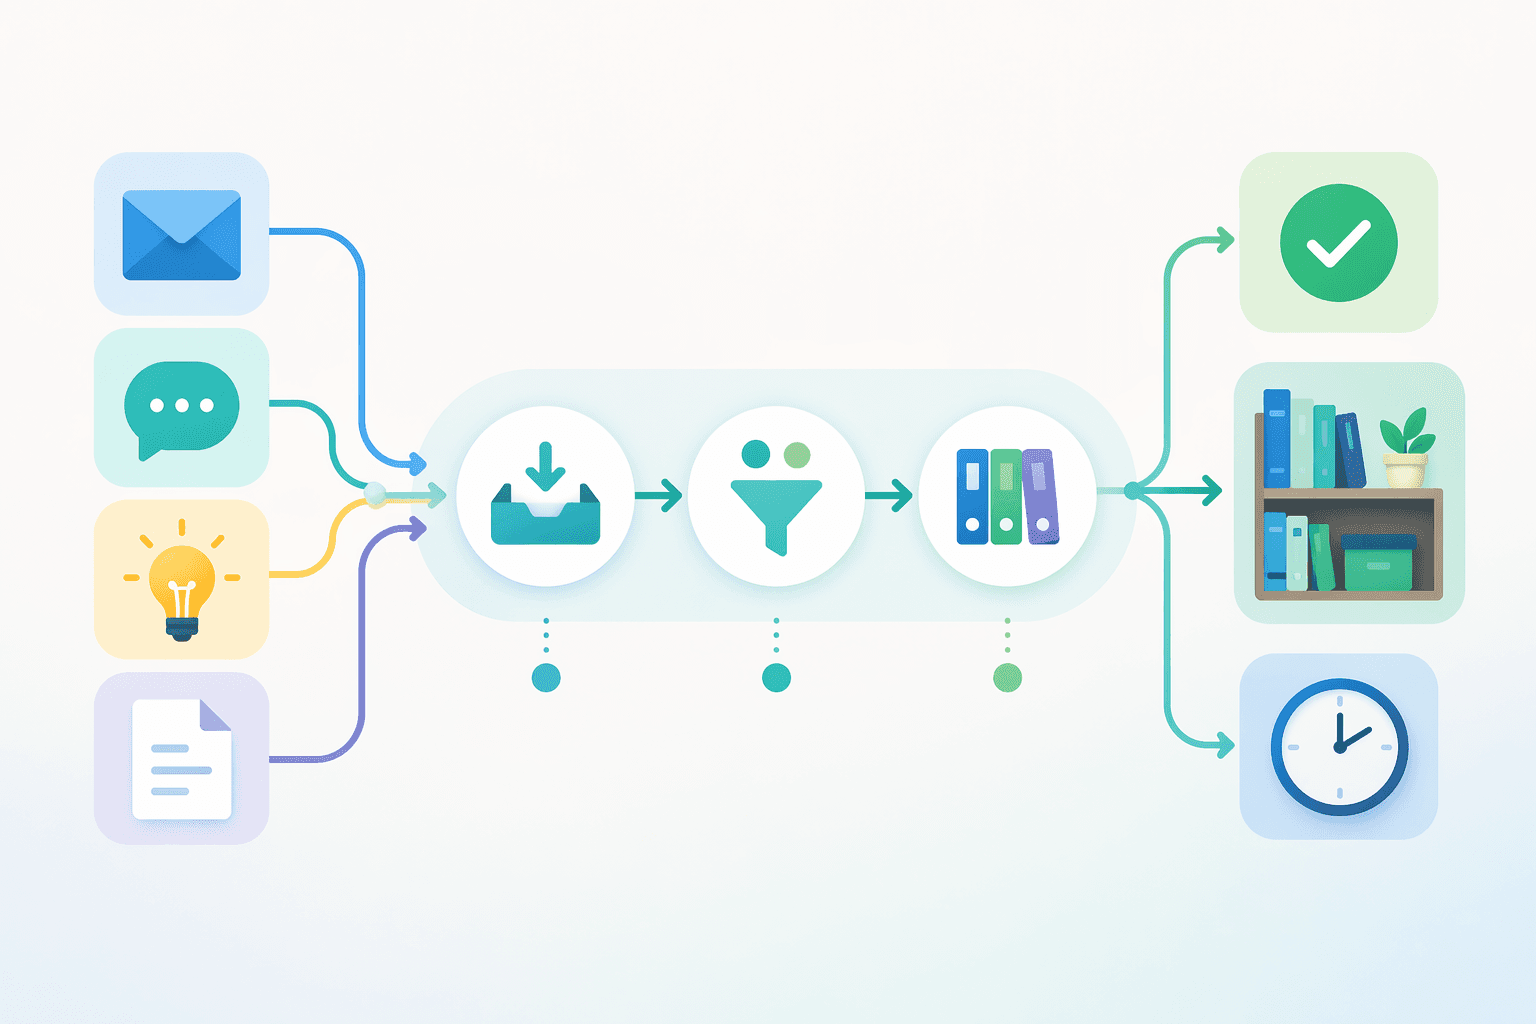
Every workflow, whether it runs inside a factory assembly line or inside your personal task management system, follows the same fundamental structure. As The Sweet Setup explains, a personal productivity workflow is built on the input-process-output model: you receive inputs (tasks, calendar events, articles, contacts, ideas), run them through a processing step (the sequence of actions those items follow through your tools), and produce outputs (completed work, stored knowledge, decisions made).
This model matters because it separates the what (your inputs and outputs) from the how (the processing pipeline). Most productivity advice focuses on the how — use this app, try this method, follow these steps — without first asking what is actually coming into your system and what you want to get out of it. By designing the pipeline first, you create a container that any specific method can fit inside.
Once you have your pipeline in place, you can choose a specific methodology for organizing the middle layer. If you are deciding between structured systems, our comparison of PARA vs. GTD vs. Zettelkasten explains how each one handles the clarify-and-organize stage differently.
Step 1: Audit Your Inputs — Give Every App a Single Job
Before you design any pipeline, you need to know what is flowing into it. Most knowledge workers underestimate the number of input channels they use. A typical day might include: email (personal and work), Slack or Teams messages, calendar invites, social media DMs, news alerts, podcast or article recommendations, meeting notes, spontaneous ideas, and task assignments from project management tools.
The first step is to list every source of incoming information you interact with in a typical week. Be honest about channels you check regularly, even if you wish you did not. Group them by type: actionable tasks, reference material, ideas for later, and messages that require a response.
Once you have your list, apply the jobs to be done framework for app selection. Originally developed by Clayton Christensen for product design, this framework asks a simple question: what job is this tool actually hired to do? The Sweet Setup applies it directly to productivity tools: every app should have one clear job. If you find yourself using the same app for quick capture, task management, note-taking, and project planning, that app is being asked to do four different jobs — and it is probably doing none of them exceptionally well.
Here is a concrete example of how the jobs-to-be-done approach maps tools to specific functions:
- Quick capture (ideas, reminders, voice memos): Drafts or Apple Notes
- Personal task management: Todoist or Things
- Work task management: ClickUp or Linear
- Long-form notes and knowledge storage: Obsidian or Notion
- Calendar and time blocking: Google Calendar or Fantastical
- File and document storage: Dropbox or iCloud Drive
Notice that no single app appears in more than one row. This is the core discipline of the jobs-to-be-done approach: when you feel the urge to use your note-taking app for task management or your task manager for note-taking, you resist it. The friction you feel from switching between apps is actually the system working correctly — each tool is optimized for its specific job.
If you find yourself overwhelmed by the sheer volume of information you want to capture and develop over time, the Second Brain method offers a complementary framework specifically designed for managing knowledge inputs and turning them into useful reference material.
Step 2: Design Your Capture-to-Execution Pipeline
With your inputs identified and your tools assigned to single jobs, the next step is to design the pipeline that connects capture to execution. This pipeline has three stages: quick capture, triage, and scheduled work.

Stage 1: Quick Capture
The capture stage is a single inbox that accepts everything. Not your email inbox — a dedicated capture tool that is fast, always accessible, and requires zero organization at the moment of entry. The rule is simple: if it takes more than five seconds to record an input, the capture tool is too slow.
Good capture tools include Drafts (which opens to a blank note instantly), Apple Notes with a widget, or a physical notebook kept on your desk. The key constraint is that this inbox must be a single destination. If you have three different places where you jot down ideas, you will lose items in the gaps between them.
Stage 2: Triage
At a dedicated time each day (or at minimum each week), you process the capture inbox. Every item gets one of three destinations:
- Actionable: Move to your task manager with a due date or priority label.
- Reference: File in your note-taking or document storage app with a clear title and location.
- Trash or defer: Delete it, or move it to a "someday" list for periodic review.
The triage stage is where most personal workflows break down. People skip it because it feels like overhead, but skipping triage is what creates the scattered feeling of having "a lot going on" without clear priorities. A triage session of 10 to 15 minutes per day is enough to keep the pipeline flowing.
Stage 3: Scheduled Work
Once items are triaged into your task manager, they need a time and a place to be executed. This means moving tasks from a "to do" list onto a calendar or a time-blocked schedule. A task that exists only in a list is a wish. A task that has a scheduled time slot is a commitment.
The goal of the entire pipeline is to get things out of your head and into a trusted system as quickly as possible, then process them systematically so that when you sit down to work, your only job is execution — not deciding what to do next.
Step 3: Choose Your Tool Stack with the 'Jobs to Be Done' Framework
By now you have a clear picture of your inputs and a three-stage pipeline. The next step is to select the specific tools that will execute each stage. The jobs-to-be-done framework makes this straightforward: map each job in your pipeline to exactly one tool.
The table below shows how common productivity jobs map to example tools. These are not recommendations for every reader — they are illustrations of how the mapping works. Your actual tool choices will depend on your platform, budget, and specific needs.
| Job | Example Tool | Why This Job Needs a Dedicated Tool |
|---|---|---|
| Quick capture (ideas, reminders, voice) | Drafts | Opens to a blank note instantly; syncs to other tools via automation |
| Personal task management | Todoist | Fast entry, natural language date parsing, project views |
| Work task and project management | ClickUp | Supports dependencies, multiple assignees, and custom views |
| Long-form notes and knowledge base | Obsidian | Local-first, Markdown-based, supports backlinks and graph view |
| Calendar and time blocking | Google Calendar | Universal compatibility, multiple calendar overlays, appointment scheduling |
| File and document storage | Dropbox | Reliable sync, version history, shared folder permissions |
If you are exploring AI-driven options for any of these categories, our category-by-category comparison of AI productivity apps covers the latest tools for quick capture, task management, note-taking, and scheduling with AI enhancements.
Step 4: Visualize Your Workflow as a Diagram
Once you have your tools mapped to jobs, draw the information flow. You do not need fancy diagramming software — a pen and paper work fine. The goal is to be able to trace any single piece of input from the moment it enters your system to the moment it is completed or stored.
Start with one input type. For example, trace an email that contains a task:
- Email arrives in Gmail (input channel).
- During triage, you forward it to your capture inbox or copy the action item into Drafts (capture).
- In your daily triage session, you move it from Drafts to Todoist with a due date (triage).
- You schedule a time block on Google Calendar to complete it (scheduled work).
- After completion, you either archive the email or move any reference information to Obsidian (output).
Do this for each major input type: messages, meeting notes, spontaneous ideas, task assignments, and reference articles. When you are done, you will have a map of your entire personal productivity system. This map reveals bottlenecks — places where items get stuck, duplicated, or lost. It also reveals gaps: input channels that have no defined path to completion.
The input-process-output diagram at the top of this article is a simplified version of what your map should look like. Your actual diagram will have more branches and specific tool names, but the structure should be the same: inputs on the left, a processing pipeline in the middle, and outputs on the right.
Step 5: Protect Flow Time with Boundaries
A well-designed workflow is useless if you spend all your time feeding the pipeline and never actually doing the work. The final step is to build boundaries that protect your deep work time from the inputs you have just organized.
The data on automation's impact is striking. Salesforce research, cross-referenced by both Kissflow and Cflow, found that 73% of IT leaders say automation helps employees save 10% to 50% of the time previously spent on manual tasks. While that statistic comes from enterprise IT departments, the principle applies directly to personal workflows: the more you automate the capture and triage stages, the more time you free for focused execution.
Here are practical boundaries you can implement today:
- Time-block your triage sessions. Do not process your inbox continuously throughout the day. Schedule two 15-minute triage blocks (mid-morning and late afternoon) and close your capture tools the rest of the time.
- Turn off all non-essential notifications. Every notification is an interruption that pulls you out of flow and costs an average of 23 minutes to recover full focus, according to multiple studies on context-switching.
- Batch similar tasks. Answer all emails in one block, review all pull requests in another, write all meeting notes at the end of the day. Batching reduces the cognitive cost of switching between different types of work.
- Use automation to handle repetitive transfers. If you regularly move items from your capture tool to your task manager, set up an automation (using Zapier, Make, or a built-in integration) to do it for you. Every manual transfer you eliminate is one less context switch.
Reflection Cadence and Starter Stacks for Different Personas
A personal workflow is not a set-it-and-forget-it system. It needs a regular reflection cadence to stay aligned with your actual work patterns. Schedule a 30-minute weekly review where you ask:
- Did every input this week find its way into the capture inbox? If not, which channels leaked?
- Did I complete my triage sessions, or did items pile up in the inbox?
- Are there tasks that have been sitting in my task manager for more than a week without being scheduled?
- Is any tool being asked to do a job it is not suited for?
If you want a structured framework for organizing the outputs of your workflow — the completed projects, stored knowledge, and archived reference material — the PARA method provides a clear system for organizing digital information into Projects, Areas, Resources, and Archives.
To help you get started without overthinking the tool selection, here are three starter stacks designed for common reader personas. Each stack assigns one tool per job and keeps the total number of tools between three and five.
| Persona | Capture | Task Management | Notes & Knowledge | Calendar | Automation |
|---|---|---|---|---|---|
| The Minimalist Student | Apple Notes | Apple Reminders | Apple Notes (same app, different folder) | Google Calendar | None (manual) |
| The Freelancer | Drafts | Todoist | Obsidian | Google Calendar | Zapier (free tier) |
| The Knowledge Worker | Drafts | Todoist or ClickUp | Notion or Obsidian | Google Calendar or Fantastical | Make or Zapier |
For readers who choose Notion as their notes and knowledge tool, our complete guide to Notion note-taking covers three different methods and includes templates for each one, making it easy to set up your knowledge base without starting from a blank page.
The most important takeaway from this entire guide is that your personal productivity workflow should be designed before you choose your tools or your methodology. Start with the inputs you actually deal with, build a pipeline that moves them from capture to completion, assign each job to a single tool, visualize the flow, and protect your execution time. The specific apps and methods can change over time — the pipeline is what makes the system resilient.
Comments
Join the discussion with an anonymous comment.