
What you are building
A zombie apocalypse budget preparedness checklist using Obsidian should open to a finished, usable system: tier folders for Basic, Standard, and Full kits; reusable checklist notes that can be reset after each audit; item notes with properties for cost, category, expiration, and acquired status; and a dashboard that shows what is missing without forcing you to reread every note.
The zombie part is useful only if it helps the system stick. The CDC’s 2011 “Preparedness 101: Zombie Apocalypse” campaign is a good reminder that a theme can pull people into emergency planning: the campaign’s Wikipedia entry reports 60,000 hits in one evening and a rise to 1.2 million Twitter followers around the effort.[1] That is enough justification for the label. It is not a reason to turn your vault into survivalist fan fiction.
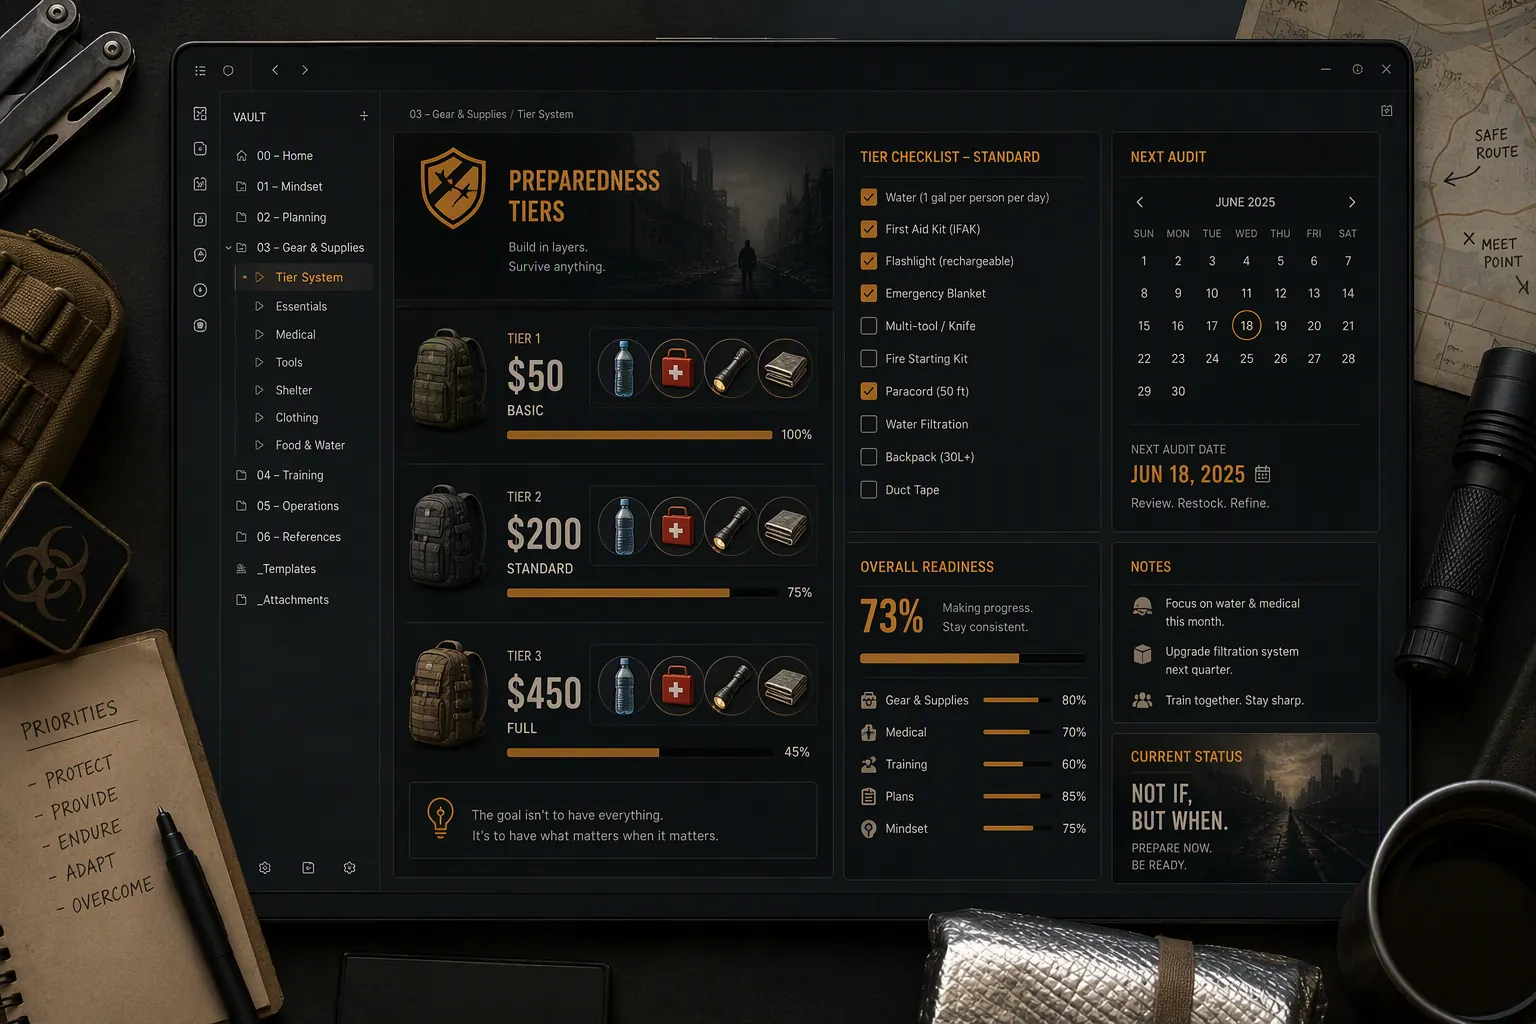
The real point is transferability. Once this vault can track water, flashlights, first aid, batteries, food, and expiration dates, the same structure can track a go-bag, pantry rotation, classroom supplies, travel packing, or any recurring checklist where “done once” is less useful than “ready to reset.”
Put the budget tiers in place before touching plugins
Cost anxiety should be handled at the top of the vault, not buried after a dozen setup steps. This build uses three tiers because they lead to different buying decisions.
| Tier | Target cost | What it means in the vault | How to treat the number |
|---|---|---|---|
| Basic | $50 | A starter kit built around low-cost essentials such as water, first aid, a flashlight, a whistle, and dust masks. | Use it as the first folder and first milestone; Fairfax County’s budget preparedness guidance emphasizes using what you already have and adding low-cost items gradually.[2] |
| Standard | $200 | A more practical 72-hour kit with additions such as a NOAA radio, multi-tool, emergency blanket, and extra food and water. | Use it as the center of the system; Protocol Survival’s 2025 under-$200 emergency kit breakdown and phased buying model support this as a realistic working tier.[3] |
| Full | ~$450.66 | A larger two-week-style kit modeled as the completion tier. | Treat this as a historical baseline, not a current shopping total. Money.com priced a CDC-recommended zombie survival kit at $450.66 using Walmart pricing in an article from 2015, last updated in 2016.[4] |
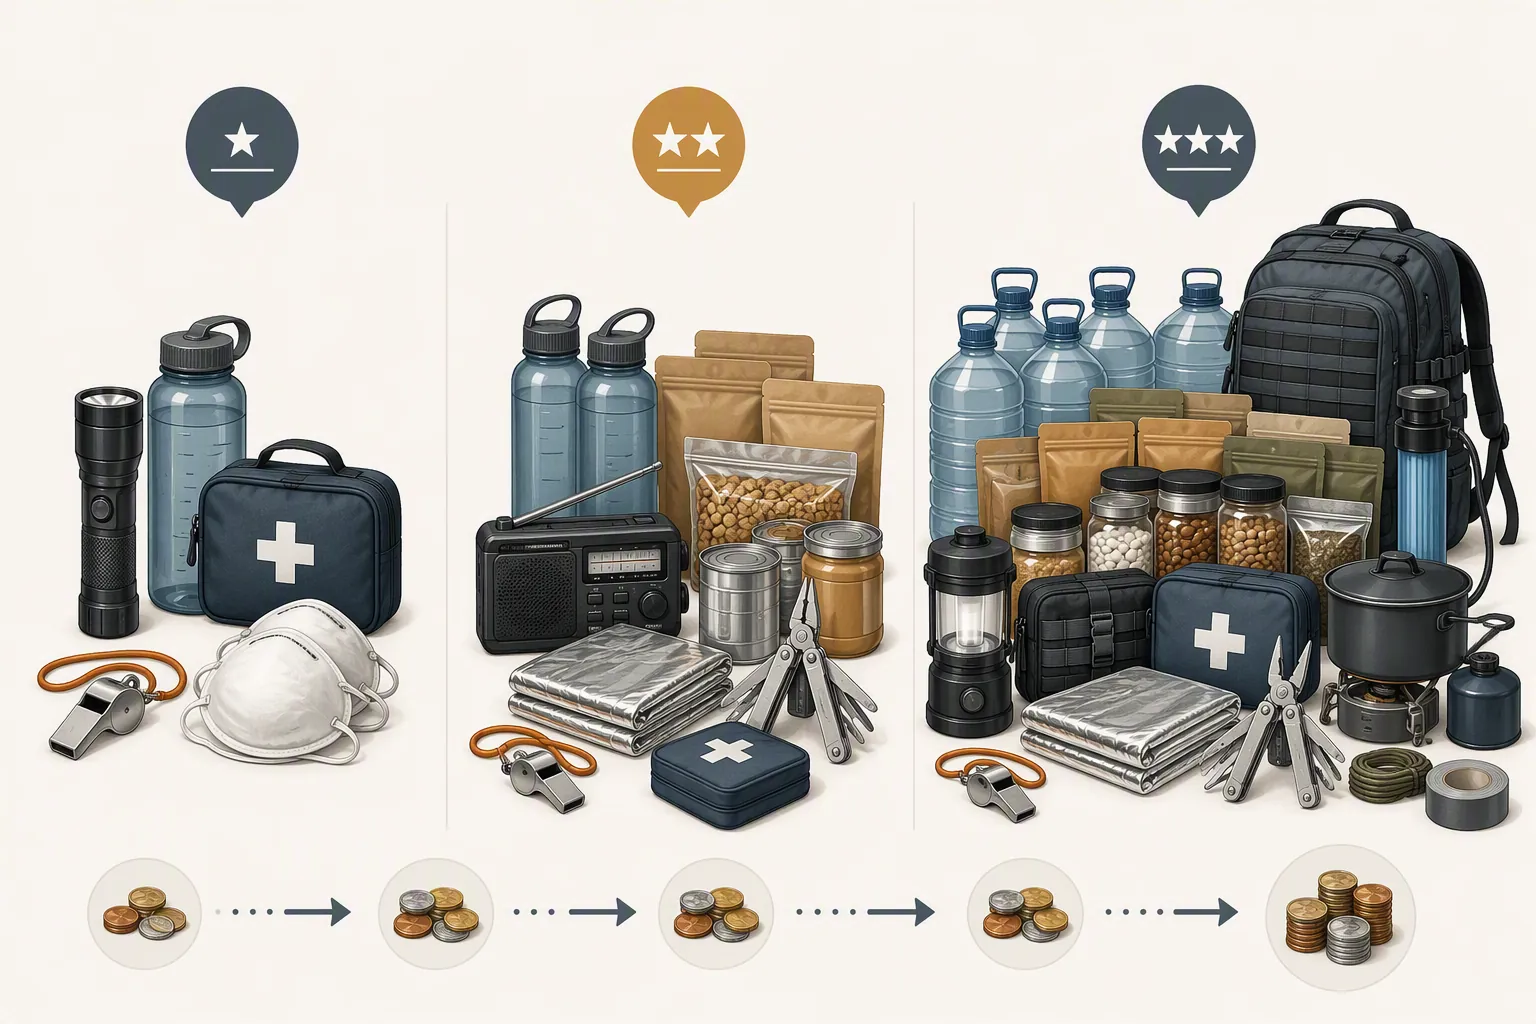
The Standard tier is the practical center because it is large enough to teach the system and small enough to buy in phases. Protocol Survival describes a $10–15 per week approach that can build a Standard kit over roughly four months.[3] Fairfax County’s “buy one extra per trip” method points in the same direction: add one item during ordinary shopping instead of treating preparedness as one expensive emergency purchase.[2]
Inside Obsidian, that means the vault should not ask, “Am I prepared?” It should ask smaller questions: Which tier is this item in? Have I acquired it? Does it expire? What should I buy next? What can wait?
Create the folder structure
Start with one clear home for the system. The folder name matters less than consistency, but this structure keeps templates, item notes, and dashboard files from turning into a junk drawer.
/Checklists/
  /Preparedness/
    Preparedness Dashboard.md
    Weekly Audit.md
    /Basic/
      Water - Basic.md
      First Aid - Basic.md
      Flashlight - Basic.md
    /Standard/
      NOAA Radio - Standard.md
      Multi Tool - Standard.md
      Emergency Blanket - Standard.md
    /Full/
      Two Week Water - Full.md
      Expanded Food - Full.md
      Backup Power - Full.md
/Templates/
  Preparedness Item Template.md
  Weekly Preparedness Audit Template.md
The tier folders do two jobs. First, they make the vault readable without Dataview. If every plugin disappeared, you could still open the Basic folder and see the first milestone. Second, they give Dataview a predictable place to search when you build the dashboard.
Keep `/Templates/` separate. You will edit templates differently from kit items, and you do not want a dashboard query accidentally counting a template as something you need to buy.
Install only the plugins this vault actually uses
This build does not need a crowded plugin stack. It needs one core feature, three practical community plugins, and one optional visual layer.
| Plugin | Role in this vault | Use it for |
|---|---|---|
| Templates | Core Obsidian feature | Inserting a standard note layout without rebuilding it each time. |
| Templater | Dynamic template engine | Adding dates, user inputs, and repeatable note scaffolding when the basic Templates plugin is not enough. |
| Checklist Reset | Reset layer | Turning a completed audit checklist back into an unchecked procedure for the next weekly review. |
| Dataview | Dashboard layer | Listing missing items, summing estimated remaining costs, and showing supplies that expire soon. |
| Checklist Progress Bar | Optional visual layer | Displaying checklist completion as a percentage above checklist blocks if you want quick progress feedback. |
The important distinction is between a one-time checklist and a reusable procedure. A one-time checklist is fine for “buy flashlight.” A weekly preparedness audit is different. You want to uncheck the same steps, inspect the same supplies, update the same properties, and come back next Sunday without rebuilding the note.
Checklist Reset is the plugin to treat carefully. The GitHub repository has a small footprint, including 23 stars, so do not build the whole system around it until you have verified current compatibility with your Obsidian version and tested it on a disposable note.[5] If it works in your setup, it is useful. If it does not, the vault still functions; you can manually uncheck the audit list or use a fresh weekly note from the template.
Build the item template
The item note is the bridge between “I made a list” and “I can audit this kit.” Obsidian checklists are useful when they are small, concrete, and easy to revisit; the Obsidian Rocks checklist guide frames checklists as working tools rather than decoration, which is the right attitude here.[6]
Create `/Templates/Preparedness Item Template.md` and use properties that Dataview can read cleanly. Keep costs as numbers, not strings with dollar signs, so later queries can sum them.
---
budget-tier: Basic
category: Water
cost: 0
acquired: false
expires:
priority: 1
source:
last-audit:
---

# <% tp.file.title %>

## Why this item is here
Write one sentence explaining the purpose of the item.

## Checklist
- [ ] Confirm the item is physically present
- [ ] Confirm the quantity is enough for the tier
- [ ] Check expiration date or battery status
- [ ] Update `acquired`, `expires`, and `last-audit`

## Notes
- Location:
- Replacement plan:
- Next purchase:
If you are using the core Templates plugin only, remove the Templater line with `<% tp.file.title %>` and type the heading manually. If you are using Templater, that line will fill the note title automatically when the template is inserted.
These properties are deliberately plain:
- `budget-tier` tells the dashboard whether the item belongs to Basic, Standard, or Full.
- `category` lets you group items by water, food, first aid, light, communication, warmth, sanitation, or tools.
- `cost` gives the dashboard a number it can total.
- `acquired` separates “planned” from “owned.”
- `expires` makes rotation visible.
- `priority` gives you a buying order inside a tier.
- `source` records where the checklist idea or price estimate came from.
- `last-audit` tells you when someone last checked the physical item.
Add the first Basic notes
The Basic tier should be boring on purpose. Ready.gov’s Build A Kit guidance covers the major categories a household kit should consider, including water, food, communication, lighting, first aid, sanitation, and documents.[7] For this vault, do not try to model every category on day one. Create the first few notes, make the dashboard work, then expand.
| File | budget-tier | category | priority | Starting note |
|---|---|---|---|---|
| Water - Basic.md | Basic | Water | 1 | The American Red Cross survival kit guidance uses the standard of 1 gallon per person per day for water planning.[8] |
| First Aid - Basic.md | Basic | First Aid | 2 | Start with an ordinary first-aid kit, then list missing items in the note. |
| Flashlight - Basic.md | Basic | Light | 3 | Track the flashlight and its batteries together, because an unpowered flashlight is just a prop. |
| Whistle - Basic.md | Basic | Signal | 4 | A low-cost signaling item that fits the starter tier. |
| Dust Masks - Basic.md | Basic | Air | 5 | A small, easy-to-forget item that benefits from being written down. |
A Basic note might look like this after you insert the item template and edit the fields:
---
budget-tier: Basic
category: Light
cost: 8
acquired: false
expires:
priority: 3
source: Fairfax County budget preparedness list
last-audit:
---

# Flashlight - Basic

## Why this item is here
A power outage kit needs a reliable light source that does not depend on a phone battery.

## Checklist
- [ ] Confirm flashlight is present
- [ ] Confirm batteries are present
- [ ] Test the light
- [ ] Update `acquired` and `last-audit`

## Notes
- Location:
- Replacement plan:
- Next purchase:
The price above is a placeholder for your local shopping reality, not a cited market price. The vault needs your numbers because the useful dashboard is the one that tells you what your remaining kit costs.
Then build out Standard and Full without pretending all prices are equal
Once Basic works, add Standard notes for the items that make the kit more functional: a NOAA radio, multi-tool, emergency blanket, additional food, additional water, extra batteries, sanitation supplies, and basic document copies. Protocol Survival’s under-$200 breakdown is useful here for category logic and phased purchasing, but it should not be treated as a requirement to buy any specific product.[3]
| Standard note | Category | Why it belongs here |
|---|---|---|
| NOAA Radio - Standard.md | Communication | Adds a dedicated emergency information source instead of relying only on a phone. |
| Multi Tool - Standard.md | Tools | Covers small repairs and utility tasks without turning the kit into a garage. |
| Emergency Blanket - Standard.md | Warmth | Low space, low weight, useful in outage or evacuation scenarios. |
| Additional Food - Standard.md | Food | Expands the kit beyond a symbolic starter pile. |
| Bleach - Standard.md | Water | Protocol Survival describes household bleach as a low-cost water purification option and cites the CDC-recommended ratio of 2 drops per quart of clear water; it prices that solution at about $4.[3] |
The Full tier needs more caution. Create the folder and notes, but mark the cost estimate as historical if you are using Money.com’s $450.66 figure. A 2015 Walmart-based price list is useful for showing that a more complete kit has a very different cost profile; it is not a current Q3 2026 shopping quote.[4]
---
budget-tier: Full
category: Water
cost: 0
acquired: false
expires:
priority: 1
source: Money.com 2015 historical baseline; update with current local pricing
last-audit:
---

# Two Week Water - Full

## Why this item is here
The Full tier models a larger kit than the 72-hour Standard tier.

## Checklist
- [ ] Calculate household water need
- [ ] Confirm storage space
- [ ] Record current local price
- [ ] Set expiration or rotation date
- [ ] Update `acquired`, `cost`, `expires`, and `last-audit`
Leaving `cost: 0` until you price the item is better than entering a confident old number. Dataview can only help if the properties are honest.
Create the dashboard
Dataview is the dashboard layer, not the whole point of the guide. The system should still make sense in folders and notes. Dataview simply gives you views that would be tedious to maintain by hand. Obsidian Rocks’ Dataview beginner guide is a useful reference for the basic pattern: query notes by folder, show selected fields, filter, sort, and group.[9]
In `/Checklists/Preparedness/Preparedness Dashboard.md`, start with a plain list of all kit items.
TABLE budget-tier AS "Tier", category AS "Category", cost AS "Cost", acquired AS "Acquired", expires AS "Expires", priority AS "Priority"
FROM "Checklists/Preparedness"
WHERE file.name != "Preparedness Dashboard"
SORT budget-tier ASC, priority ASC
Then add a missing-items view. This is the view you check before shopping.
TABLE budget-tier AS "Tier", category AS "Category", cost AS "Estimated Cost", priority AS "Priority"
FROM "Checklists/Preparedness"
WHERE acquired = false AND file.name != "Preparedness Dashboard"
SORT budget-tier ASC, priority ASC
Add a remaining-cost view by tier. This works only if your `cost` values are numbers.
TABLE sum(rows.cost) AS "Estimated Remaining Cost"
FROM "Checklists/Preparedness"
WHERE acquired = false AND cost AND file.name != "Preparedness Dashboard"
GROUP BY budget-tier AS "Tier"
Finally, add an expiration view. This is where preparedness stops being a shopping list and starts becoming a rotation system.
TABLE budget-tier AS "Tier", category AS "Category", expires AS "Expires"
FROM "Checklists/Preparedness"
WHERE acquired = true AND expires AND expires <= date(today) + dur(30 days)
SORT expires ASC
If the expiration query returns nothing, that can mean everything is fine. It can also mean you entered dates as text. Use date-style values such as `2026-10-15`, not `October sometime`.
Make the weekly audit reusable
Create `/Templates/Weekly Preparedness Audit Template.md`. This note is not an inventory item. It is the procedure you run each week or each shopping cycle.
# Weekly Preparedness Audit - <% tp.date.now("YYYY-MM-DD") %>

## Reset and review
- [ ] Open Preparedness Dashboard
- [ ] Check missing Basic items
- [ ] Check missing Standard items
- [ ] Check items expiring within 30 days
- [ ] Pick one affordable item for the next shopping trip
- [ ] Update acquired status on any purchased item notes
- [ ] Update expiration dates where needed
- [ ] Update last-audit on reviewed item notes

## Shopping decision
- Budget available this week:
- Item selected:
- Tier:
- Reason:

## Notes
- What moved forward:
- What is blocked:
- What needs repricing:
The weekly routine is simple enough to keep using:
- Open the dashboard.
- Look at missing Basic items first.
- If Basic is done, look at Standard.
- Pick one item that fits the week’s budget.
- After buying or verifying it, open the item note and update `acquired`, `cost`, `expires`, and `last-audit`.
- Use Checklist Reset on the weekly audit note before the next review, or create a fresh weekly audit note from the template.
That one-extra-item habit is what makes the system durable. A $200 target becomes less intimidating when the dashboard turns it into this week’s single decision instead of a cart full of guilt.
What to test before trusting the vault
Before using this as your real preparedness tracker, make a `Reset Sandbox.md` note with three dummy checkboxes. Run Checklist Reset there first. Confirm that it resets only what you expect, then try it on a copied weekly audit note. Do not test reset behavior on your only working audit note.
The common breakpoints are easy to spot:
- If the cost total does not work, check whether `cost` contains `$8` instead of `8`.
- If expiration alerts do not work, check whether `expires` is a real date value.
- If dashboard results include templates, add a folder exclusion or keep templates outside `/Checklists/Preparedness/`.
- If Checklist Reset behaves unpredictably, remove it from the workflow and create a fresh audit note from the template each week.
- If the Full tier looks too expensive, leave it as a roadmap and keep buying toward Basic or Standard.
The vault is working when it can answer five questions without drama: what is acquired, what expires soon, which tier each item belongs to, what the remaining budget looks like, and what gets reset for the next audit.
Use the zombie vault as the pattern, not the endpoint
Once the preparedness vault works, copy the structure instead of starting from scratch. Replace `budget-tier` with `trip-stage`, `classroom-term`, `pantry-zone`, or `bag-type`. Keep the same pattern: item notes, reusable audit note, dashboard queries, and a reset loop.
That is the useful lesson hidden inside the theme. The zombie checklist gives you a concrete reason to learn Obsidian templates, properties, Dataview, and resettable procedures. The kit improves as you buy and audit. The vault improves because you now have a checklist machine you can reuse anywhere recurring work needs to become visible again.
References
- “Preparedness 101: Zombie Apocalypse,” Wikipedia.
- “Emergency Preparedness on a Budget: 5 Low-Cost Ways,” Fairfax County.
- “Prepping on a Budget: Emergency Kit Under $200,” Protocol Survival, 2025.
- “How Much a Zombie Apocalypse Survival Kit Costs,” Money.com, Oct. 2015; last updated Feb. 2016.
- “lhansford/obsidian-checklist-reset,” GitHub.
- “Obsidian Checklists,” Obsidian Rocks.
- “Build A Kit,” Ready.gov.
- “Survival Kit Supplies,” American Red Cross.
- “Dataview in Obsidian: A Beginner’s Guide,” Obsidian Rocks.





Comments
Join the discussion with an anonymous comment.