 Automation Recipe
How to Choose and Set Up Your First Process Automation Tool: A Step-by-Step Guide for Knowledge Workers
This guide helps knowledge workers, freelancers, and small-team leads choose their first process automation tool by matching workflow complexity, budget, and technical comfort. It includes a self-assessment, a head-to-head comparison of top tools (Zapier, Make, n8n, Gumloop, Power Automate), a decision tree, a generic setup walkthrough, common first-automation templates, cost traps to avoid, and a pre-launch validation checklist.
By Editorial Team
- workflow-automation
- Zapier
- Make
- n8n
- Power-Automate
What Is a Process Automation Tool?
A process automation tool is a piece of software that lets you connect apps and services so they can perform routine tasks without you having to do them manually. Instead of copying data from an email into a spreadsheet, then sending a Slack message, you set up a rule once: "When an email arrives with this subject line, create a row in the spreadsheet and post a notification in Slack." The tool runs that rule every time the trigger condition is met.
These tools sit in a specific spot on the automation spectrum. They are more accessible than robotic process automation (RPA), which typically requires dedicated infrastructure and IT support, and they are more action-oriented than a simple email filter. If you are a knowledge worker, freelancer, or small-team lead who has never set up an automated workflow before, a process automation tool is the most practical entry point.
The 5-Minute Self-Assessment: Map Your Workflows, Count Your Steps, Know Your Budget
Before you evaluate any tool, take five minutes to clarify what you actually need. Most first-time automation projects fail not because the tool was bad, but because the person chose a platform that was either too simple for their workflow or too expensive for their volume. Answer these three questions to build your personal profile.
1. Workflow complexity: How many steps and conditions does your process have?
Draw the process you want to automate on a piece of paper or in a simple document. Count the number of distinct actions between the trigger and the final outcome. A simple two-step workflow might be: "When I receive an email with an invoice attachment, save the attachment to Google Drive." A multi-step workflow might be: "When a new row appears in my CRM, check if the lead score is above 80, then create a task in Asana, send a personalized email via Gmail, and log the interaction in a Google Sheet."
- Simple (2–3 steps, no conditions): Any tool will work. Focus on ease of use and free plan limits.
- Moderate (4–8 steps, some conditional branches): You need a tool with a visual builder and basic logic (if/then, filters).
- Complex (8+ steps, multiple conditions, loops, or API calls): Look for tools with per-execution pricing and advanced logic support.
2. Expected volume: How many times will this workflow run per month?
Estimate the monthly run count for your most frequent automation. A workflow that runs 50 times per month is very different from one that runs 10,000 times. This number directly affects your cost because most platforms charge per task, per execution, or per operation.
- Low volume (under 1,000 runs/month): Free plans or entry-level paid plans will likely cover you.
- Medium volume (1,000–10,000 runs/month): Watch per-task pricing carefully. A 10-step workflow at 5,000 runs equals 50,000 billed tasks on some platforms.
- High volume (10,000+ runs/month): Per-execution pricing models become significantly more cost-effective.
3. Budget: What are you willing to spend per month?
Set a monthly ceiling before you look at pricing pages. Include not just the subscription cost but also potential overage charges. If your budget is $0–$30/month, you will rely heavily on free tiers and entry-level plans. If you can spend $30–$100/month, you have access to most mid-tier plans. Above $100/month, you can consider self-hosted options or team plans.
Head-to-Head Comparison: Zapier, Make, n8n, Gumloop, and Power Automate
The five tools below represent the most practical starting points for knowledge workers in 2026. Each has a different pricing model, integration ecosystem, and learning curve. The table summarizes the key data points; the paragraphs below explain what each difference means for a first-time user.
| Tool | Free Tier | Entry-Level Paid Plan | Pricing Model | Integration Count | Best For |
|---|---|---|---|---|---|
| Zapier | 100 tasks/month, two-step Zaps | Pro: $29.99/month (multi-step, unlimited premium apps) | Per task | 7,000+ apps (some sources cite 9,000+) | Simple to moderate workflows; users who want the largest app directory |
| Make | 1,000 credits/month | Core: $10.59/month (10,000 credits/month) | Per operation (credit-based) | 2,000+ apps | Visual drag-and-drop builders; moderate complexity workflows |
| n8n | Community edition (self-hosted, free) | Starter: $24/month (2,500 workflow executions) | Per workflow execution | 400+ native nodes; 5,000+ community templates | Complex, multi-step workflows; users comfortable with self-hosting or cloud |
| Gumloop | 5,000 credits/month (free plan) | Pro: $37/month (20,000+ credits/month, unlimited seats) | Per credit (includes built-in LLM models) | AI-focused integrations | AI-heavy workflows; users who want built-in LLM access without API keys |
| Power Automate | Limited free tier (Microsoft 365 users) | Premium: $15/user/month | Per user per month | Deep Microsoft 365 integration; 1,000+ connectors | Organizations already in the Microsoft ecosystem |
The most important distinction in this table is the pricing model. Zapier charges per task, which means a single workflow run counts as multiple tasks if it has multiple steps. A 10-step workflow that runs 10,000 times in a month consumes 100,000 tasks. On n8n, the same workflow counts as 10,000 executions because it charges per workflow run, not per step. Independent analyses suggest this can reduce costs by 80–90% for complex workflows compared to Zapier.
Make uses a credit system where each operation in a scenario consumes a certain number of credits. This is similar to per-task pricing but with more granularity. Gumloop uses credits that also cover AI model usage, which is unique among these five tools — you do not need to bring your own API keys for LLM calls. Power Automate is the only tool on this list that charges per user per month rather than per volume of work, which can be an advantage for teams with many low-volume workflows.
For a deeper look at how these tools fit into an IT stack — especially if you are evaluating enterprise considerations like governance, compliance, or SSO — see our dedicated comparison: Power Automate vs Zapier vs Make in 2026: When to Use Each for Your Automation Stack.
Decision Tree: Which Tool for Which Scenario?
Use your self-assessment profile to follow the path that matches your situation.
Scenario A: Simple two-step automation, low volume, under $30/month
You want to automate something like "save email attachments to Google Drive" or "add new Typeform responses to a spreadsheet." Your workflow has no conditional branches and runs fewer than 500 times per month.
- Best pick: Zapier free plan (100 tasks/month) or Make free plan (1,000 credits/month). Both are zero-cost and handle simple two-step flows easily.
- Runner-up: Gumloop free plan (5,000 credits/month) if you want to experiment with AI features later.
Scenario B: Multi-step workflow with conditions, moderate volume, $30–$60/month
Your automation has 5–10 steps, includes if/then logic, and runs 2,000–5,000 times per month. You need a visual builder to manage the complexity.
- Best pick: Make Core plan ($10.59/month) or n8n Starter plan ($24/month). Make's visual builder is excellent for moderate complexity. n8n's per-execution pricing saves money as volume grows.
- Avoid: Zapier Pro ($29.99/month) if your workflow has many steps — the per-task cost adds up quickly.
Scenario C: AI-heavy workflow with LLM calls, moderate to high volume
You want to summarize emails, classify support tickets, or generate personalized responses using large language models. You do not want to manage API keys or separate AI subscriptions.
- Best pick: Gumloop Pro ($37/month). Its credits include built-in LLM models, so you do not need to set up OpenAI or Anthropic accounts.
- Runner-up: n8n (Starter or Pro) with its native LangChain integration and 70+ AI nodes introduced in n8n 2.0 (January 2026). This requires more setup but offers more flexibility.
Scenario D: Microsoft-centric team, per-user pricing preferred
Your team lives inside Microsoft 365 — Outlook, Teams, SharePoint, Dynamics. You want per-user pricing rather than per-volume pricing because each person runs a few low-volume workflows.
- Best pick: Power Automate Premium ($15/user/month). Deep native integration with Microsoft 365 apps.
- Consider: Make or n8n if you also need to connect to non-Microsoft apps frequently.
Step-by-Step Setup Guide: From Trigger to Live Workflow
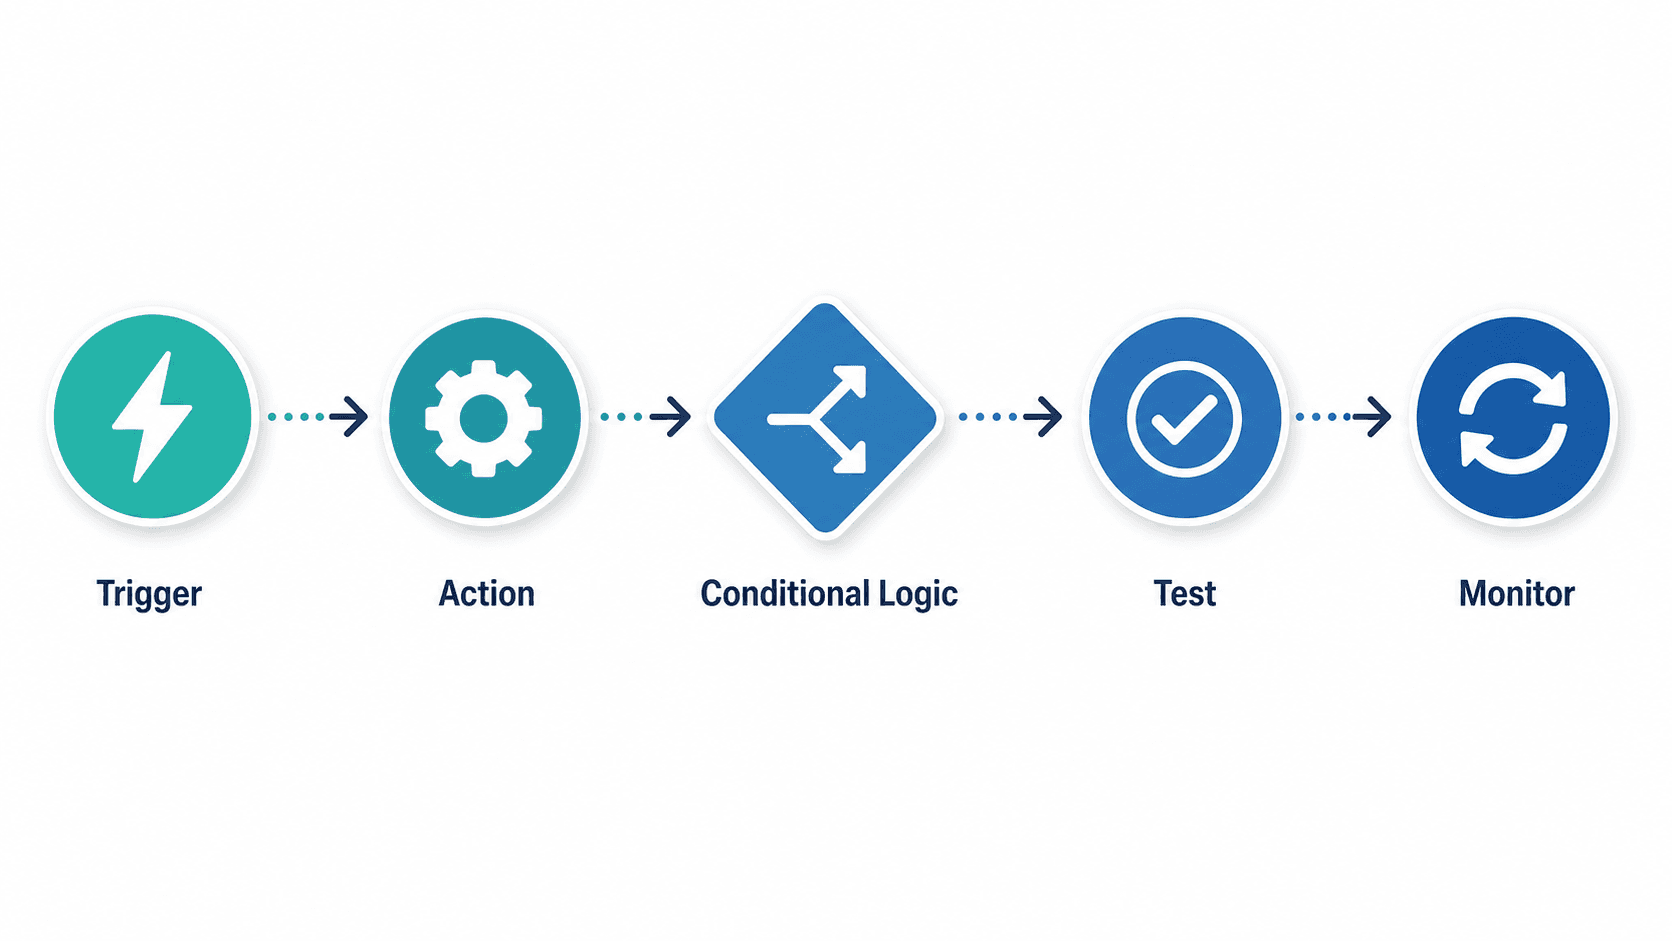
The following five-step process works across Zapier, Make, n8n, Gumloop, and Power Automate. The specific buttons and menus differ, but the logical sequence is the same.
Step 1: Identify the trigger
The trigger is the event that starts your workflow. Common triggers include: a new email arrives, a new row is added to a spreadsheet, a form is submitted, or a file is uploaded to a folder. In your tool's dashboard, create a new workflow and select the trigger app. Authenticate your account and configure the specific trigger event (e.g., "when a new email arrives in this folder").
Step 2: Define the action
The action is what happens when the trigger fires. Add a new step and select the destination app. Map the data fields from the trigger to the action. For example, if the trigger is a new email, map the email subject to a spreadsheet column and the email body to another column. Most tools let you click a field in the trigger output and drag it to the corresponding field in the action input.
Step 3: Add conditional logic (if needed)
If your workflow should only run under certain conditions, add a filter or conditional branch. For example: "Only create a task if the email subject contains 'Invoice'" or "If the lead score is above 80, send to the sales team; otherwise, send to the nurture sequence." In Zapier, this is called a Filter step. In Make, you use a Router module. In n8n, you add an IF node.
Step 4: Test with a single record
Before you turn on the workflow, run a test with one real or sample record. Every tool has a "test" or "run once" button. Verify that the data flows correctly from trigger to action and that any conditional branches behave as expected. Check the output in the destination app — did the right data end up in the right fields?
Step 5: Monitor and iterate
After the workflow goes live, check its execution history regularly for the first few days. Look for failed runs, skipped records, or unexpected behavior. Most tools provide a log or history view. If you see errors, adjust the data mapping or conditional logic and test again. Automation is rarely perfect on the first attempt.
Common First-Automation Templates to Get You Started

These three templates are designed to be built in under 15 minutes each. They represent the highest-value, lowest-risk starting points for a first automation project.
Template 1: Email to Task
- Trigger: New email arrives in Gmail or Outlook with a specific label or subject keyword
- Action: Create a task in Todoist, Asana, or Notion with the email subject as the task title and the email body as the description
- Outcome: You never lose an action item buried in your inbox again
Template 2: Form to CRM
- Trigger: New response submitted in Google Forms, Typeform, or Jotform
- Action: Add a new contact or lead in HubSpot, Salesforce, or a Google Sheet
- Outcome: New leads are captured in your CRM instantly without manual data entry
Template 3: Slack Notifications for Key Events
- Trigger: A new sale is recorded in Stripe, a new support ticket is created in Zendesk, or a new row is added to a critical spreadsheet
- Action: Post a formatted message to a specific Slack channel
- Outcome: Your team gets real-time visibility into important events without checking multiple dashboards
Cost Traps to Avoid: Per-Task Pricing, Self-Hosting Overhead, and Credit Systems
The pricing model you choose today can cost you ten times more next month if your workflow scales. Here are the three most common traps first-time automation users fall into.
Trap 1: Zapier's per-task pricing at scale
Zapier counts every step in a workflow as a separate task. A 10-step workflow that runs 10,000 times in a month consumes 100,000 tasks. On Zapier's Pro plan ($29.99/month), you get 2,000 tasks per month. To cover 100,000 tasks, you would need to upgrade to a much more expensive plan or pay significant overage fees. This is the single most common surprise for new automation users.
If your workflow has more than a few steps and you expect moderate to high volume, n8n's per-execution pricing is worth evaluating. The same 10-step workflow running 10,000 times counts as 10,000 executions on n8n, which independent analyses suggest can reduce costs by 80–90% compared to Zapier.
Trap 2: n8n's self-hosting overhead
n8n's Community edition is free and powerful, but self-hosting it requires a server, regular updates, backups, and monitoring. If you are not comfortable with basic server administration or do not have IT support, the hidden cost of your time maintaining the server can exceed the subscription cost of a cloud-hosted tool. n8n's cloud plans (Starter at $24/month, Pro at $60/month) eliminate this overhead and are still cheaper than Zapier for complex workflows.
Trap 3: Make's credit system and operation limits
Make charges per operation, and each operation consumes a certain number of credits. A simple data lookup might consume 1 credit, while a more complex operation like an HTTP request or a data transformation might consume 5 or 10 credits. If your workflow uses many high-credit operations, your actual usage can exceed your plan's credit limit faster than you expect. Make's Core plan ($10.59/month) includes 10,000 credits/month, but a single workflow run could consume 20–50 credits depending on its complexity.
For a deeper dive into cost optimization strategies for small businesses, see our dedicated article: Workflow Automation for Small Business in 2026: Which Platform Makes Sense When You're on a Budget?.
Pre-Launch Validation Checklist
Before you flip the switch and let your automation run unattended, run through this checklist. It takes five minutes and can prevent hours of cleanup later.
- Tested with a single real record and verified the output in the destination app.
- Checked that all data fields are mapped correctly — no empty fields, no wrong data types.
- Set up error notifications (email or Slack) so you know immediately if a run fails.
- Checked for infinite loops — does your automation trigger itself? For example, if the action updates a spreadsheet and the trigger watches for spreadsheet changes, you have a loop.
- Reviewed the billing impact: estimated monthly task/execution/credit consumption vs. your plan limits.
- Set a calendar reminder to review the workflow's execution history after one week.
Once you have checked all seven items, you can confidently turn on your automation. Start with a single workflow, let it run for a week, and then decide whether to build the next one. Most knowledge workers find that their first automation saves them 2–5 hours per week — and that is usually enough motivation to start planning the second.
Comments
Join the discussion with an anonymous comment.