 Automation Recipe
How to Audit, Map, and Automate Your Document Workflows: A 5-Step Framework
A repeatable framework for operations leads and IT managers to audit manual document processes, map workflows end-to-end, define roles, select the right tools, and standardize with templates — before writing a single line of automation.
By Editorial Team
- workflow-automation
- automation
- step-by-step
- beginner
- teams
Why Manual Document Workflows Are Costing You More Than You Think
Every day, your team likely wrestles with the same invisible tax: documents trapped in email threads, approval requests that sit for a week, and data re-entered manually from one system into another. These aren't minor annoyances — they represent a measurable drain on productivity and accuracy. According to data cited by DocuClipper, only 4% of businesses have fully automated their workflows, while 66% of organizations have automated at least one business function. The average organization saves roughly $46,000 per year by automating finance-related workflows alone. Yet most teams never see those savings because their automation projects stall before they even start.
The reason isn't a lack of good tools. The market is flooded with capable platforms, and the global workflow automation market was valued at $26.5 billion in 2024, projected to exceed $78 billion by 2030. The real bottleneck is that teams skip the foundational work: auditing what they currently do, mapping the process end-to-end, and designing the future workflow before touching a single piece of software. A report from AIIM, cited by Box, found that only 29% of organizations view their process and workflow design skills as advanced or expert. That means nearly three-quarters of teams are flying blind when they start an automation initiative.
This guide presents a repeatable 5-step framework — choose, map, define roles, select tools, and standardize — designed to turn manual document chaos into a scalable automated workflow. The emphasis is on steps 1 through 3: the audit and mapping pre-work that determines whether your automation project succeeds or becomes another abandoned initiative. If you are an operations lead, IT manager, or team lead planning your first (or next) document automation rollout, this framework gives you a structured path forward.
For a related framework tailored to small business needs, see our guide on process automation setup for small businesses. To clarify terminology before you start, our comparison of workflow automation, process automation, and RPA can help you speak the same language as your stakeholders.
Step 1: Choose the Right Process to Automate First
The most common mistake is trying to automate everything at once. Instead, pick one process that meets three criteria: it is repeatable, manual, and time-intensive. A repeatable process happens on a regular cadence — weekly expense reports, monthly client onboarding, quarterly compliance filings. A manual process involves human steps that could be handled by software: data entry, email reminders, file transfers. A time-intensive process consumes disproportionate staff hours relative to its strategic value.
Use the following decision table to evaluate candidate processes. Score each criterion from 1 (low) to 3 (high). The process with the highest total score is your best starting point.
| Criterion | What to Look For | Score 1 | Score 2 | Score 3 |
|---|---|---|---|---|
| Repeatability | How often does this process run? | Quarterly or less | Monthly | Weekly or daily |
| Manual Effort | How many human touchpoints exist? | 1–2 steps | 3–5 steps | 6+ steps |
| Time Intensity | How many person-hours per cycle? | Under 1 hour | 1–4 hours | Over 4 hours |
| Error Risk | How often do mistakes happen? | Rarely | Occasionally | Frequently |
| Stakeholder Pain | How loudly do people complain about it? | Mild annoyance | Moderate frustration | Major bottleneck |
Avoid choosing a process that involves multiple legacy systems, unclear ownership, or heavy regulatory compliance for your first attempt. Those are better tackled after your team has gained experience with the framework.
Step 2: Map the Workflow End-to-End
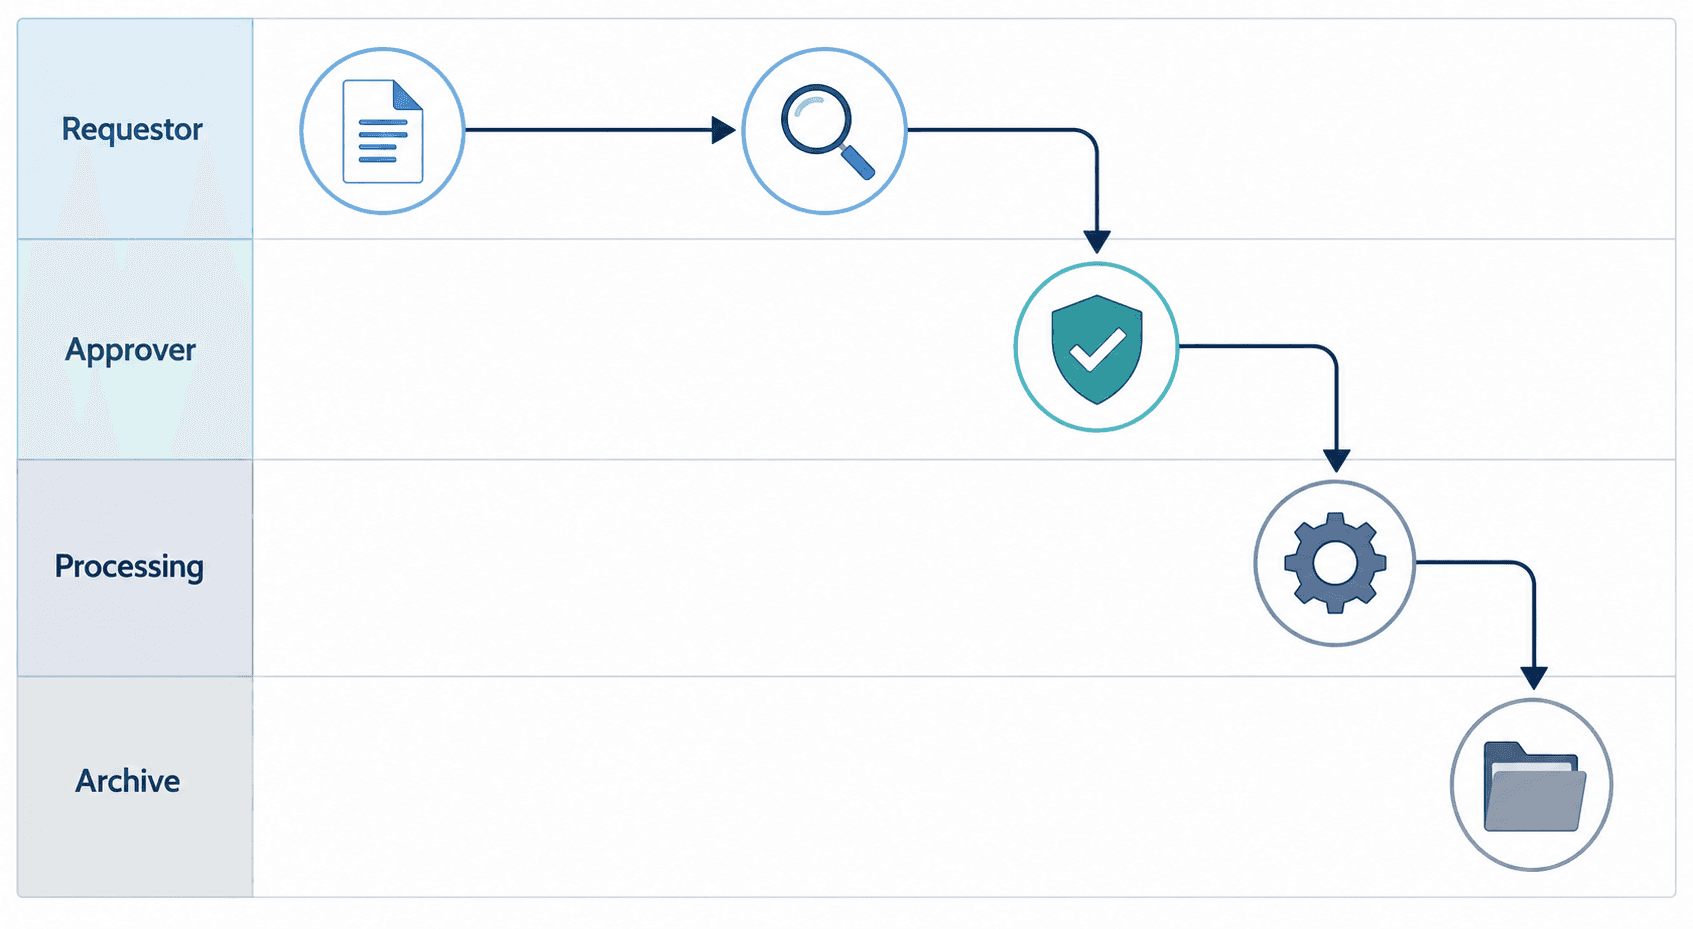
This is the step that separates successful automation projects from failed ones. Mapping the workflow end-to-end means documenting every step, decision point, handoff, and approval gate — not just the ones you remember off the top of your head. The goal is to create a visual representation of the current state (the "as-is" workflow) before designing the future state (the "to-be" workflow).
A swim-lane diagram is the most effective format for this. Each department or role gets its own horizontal lane. The document (or information) moves from left to right through these lanes, and every time it crosses a lane boundary, that is a handoff. Handoffs are where delays and errors accumulate. According to Camunda's State of Process Orchestration 2025 report, cited by Box, 85% of organizations find process management more complex when combining automated tasks, with 56% attributing this complexity to legacy systems. Mapping reveals exactly where those legacy handoffs live.
To build your swim-lane diagram, follow these steps:
- Identify every role or department that touches the document. Common lanes include Requestor, Reviewer, Approver, Processing Team, and Archive.
- List every step in sequence, from initiation to final storage. Include decision diamonds (e.g., "Approved? Yes/No") and parallel tasks.
- Mark every manual touchpoint — data entry, email forwarding, file download/upload, manual signature. These are your automation candidates.
- Note the average time each step takes. Use estimates from team interviews, not guesses. A step that takes "a few minutes" might actually take 20 when you measure it.
- Highlight bottlenecks: steps where work sits idle waiting for a person to act. These are your highest-value automation targets.
Once the "as-is" map is complete, create a "to-be" version that removes redundant steps, automates manual touchpoints, and streamlines handoffs. The "to-be" map becomes your blueprint for tool selection and implementation.
Step 3: Define Owners, Contributors, and Permissions
A mapped workflow is useless if no one knows who is responsible for each step. Role definition must happen before tool selection because different tools handle permissions, notifications, and escalation paths differently. If you define roles first, you can evaluate tools against a clear requirements list rather than adapting your process to whatever permissions model a tool offers.
For each step in your "to-be" workflow, identify:
- Who initiates the document or request?
- Who reviews the content for accuracy and completeness?
- Who has approval authority? Is a single approver sufficient, or does the document need sequential or parallel approvals?
- Who processes the approved document (e.g., generates a PO, updates a CRM record, files a report)?
- Who archives the final version and for how long?
Document these roles in a simple responsibility matrix. Here is a template:
| Step | Role | Permission Level | Escalation If Stalled |
|---|---|---|---|
| Submit expense report | Employee | Create, Edit | N/A |
| Review for policy compliance | Manager | View, Comment | After 2 days → Director |
| Approve payment | Finance Lead | Approve, Reject | After 3 days → CFO |
| Process payment | Accounts Payable | Edit, Execute | After 1 day → Finance Lead |
| Archive report | System (automated) | Read-only after archive | N/A |
Also define escalation paths for stalled approvals. A common pattern is: if an approver does not act within 48 hours, the request automatically escalates to their manager. This simple rule, implemented in the tool, was what allowed Moneytree to reduce its approval cycles from 7 days to 1, according to Wrike's case study.
Step 4: Select Tools That Support Your Mapped Workflow
With your workflow mapped and roles defined, you now have a requirements document — not a wish list, but a concrete set of needs. Use the following evaluation checklist to assess any automation tool against your specific workflow:
- Integration with existing systems: Does the tool connect to your CRM, ERP, email platform, and document storage without custom development? Check for pre-built connectors.
- Security and compliance: Does the tool support your industry's regulatory requirements (SOC 2, HIPAA, GDPR)? Can it enforce the permission levels you defined in Step 3?
- Scalability: Can the tool handle your projected document volume for the next 2–3 years? Does pricing scale linearly or jump at tier boundaries?
- No-code / low-code capability: Can your operations team build and modify workflows without developer support? This is critical for long-term maintainability.
- Audit trail and reporting: Does the tool log every action, decision, and timestamp? Can you generate reports on cycle times, bottlenecks, and approval rates?
Keep your initial tool selection simple. A no-code platform that handles triggers, routing, approvals, and notifications is sufficient for 80% of document workflows. You can add specialized tools (e-signature, OCR, AI document classification) later as your automation maturity grows.
Step 5: Standardize with Templates and Document Your Process
Standardization is what makes automation scalable. Without it, every new workflow requires custom configuration, and your automation initiative becomes a collection of one-off scripts rather than a coherent system. The goal is to create reusable components that enforce consistency across your organization.
Start with three types of templates:
- Document templates: Standardized forms, contracts, or reports with predefined fields, formatting, and approval blocks. These ensure every document starts from the same structure.
- Approval templates: Pre-configured routing rules that define who approves what, in what order, and what happens if a deadline is missed. These encode your role-responsibility matrix into the tool.
- Notification templates: Standardized email or Slack messages for each workflow event — submission received, review needed, approval granted, rejection with reason, escalation triggered.
Alongside templates, establish naming conventions and a storage structure. A consistent file-naming convention (e.g., YYYY-MM-DD_ProjectName_DocumentType_Version) prevents the chaos of "final_v3_reallyfinal.pdf." A clear folder or database structure ensures that archived documents are retrievable without manual searching.
Real Results: What Teams Achieved with This Framework
The following case studies, drawn from Wrike's customer stories, illustrate what the 5-step framework enables when applied to real document workflows. These are vendor-authored examples and may represent best-case outcomes, but they demonstrate the magnitude of improvement possible when audit, mapping, and role definition precede tool implementation.
- Moneytree: Reduced approval cycles from 7 days to 1 day by implementing automated notifications and escalation rules. The mapped workflow revealed that the primary bottleneck was not the approval itself but the time documents spent waiting in inboxes.
- Jellyfish: Logged 95% less time summarizing client calls after automating their document creation and distribution workflow. The pre-automation audit showed that team members were spending nearly an hour per call on manual summaries.
- Kalexius: Saved approximately 20% of their time managing 1,000-contract projects by standardizing templates and automating approval routing. The mapping phase identified 14 distinct manual handoffs in their original contract workflow.
Across all three cases, the common pattern is clear: the teams that invested time in the audit and mapping phases (Steps 1–3) achieved disproportionate improvements. The tools they selected were secondary to the clarity they gained from understanding their own workflows first.
Common Pitfalls and How to Avoid Them
Even with a solid framework, teams encounter predictable obstacles. Here are the most frequent pitfalls and practical strategies to avoid them.
- Automating a broken process: If the current workflow is inefficient, automating it only makes you fail faster. Always map and redesign the "as-is" workflow before implementing any automation.
- Skipping stakeholder buy-in: Automation changes how people work. If the team that processes documents daily is not involved in the mapping and design phases, they will resist the new system. Include representatives from every lane in your swim-lane diagram.
- Over-engineering the first workflow: Your first automation should handle 80% of cases, not 100%. Edge cases and exceptions can be managed manually until you have experience. A simple workflow that works is better than a perfect workflow that never launches.
- Neglecting training and change management: A new tool is only as good as the team's ability to use it. Budget time for training, create quick-reference guides, and designate a power user who can answer questions during the first month.
- Failing to monitor and iterate: Automation is not a set-and-forget solution. Monitor cycle times, error rates, and user feedback monthly. Adjust your workflows as business needs evolve.
Frequently Asked Questions
How long does the audit phase take?
For a single process, expect 1–2 weeks. This includes interviewing stakeholders, mapping the current workflow, identifying bottlenecks, and designing the future state. For organizations with no existing workflow documentation, add a week for discovery.
What if my organization has no workflow documentation at all?
That is the norm, not the exception. Start by shadowing the people who perform the process daily. Ask them to walk you through a real example from start to finish. Document what they describe, then validate the map with their manager. The swim-lane diagram in Step 2 is designed for exactly this scenario.
Do I need a dedicated automation team?
No. Many successful automation initiatives start with one person — often an operations lead or IT manager — who champions the framework. As the initiative grows, you may designate a part-time automation coordinator. Dedicated teams become necessary only when you are managing 10+ automated workflows across multiple departments.
Can this framework work for a single department?
Absolutely. In fact, starting with a single department — finance, HR, or operations — is the recommended approach. The framework scales down cleanly. A department-level implementation typically takes 2–4 weeks from audit to first automated workflow.
How do I measure success after implementation?
Track three metrics: cycle time (how long a document takes from initiation to completion), error rate (percentage of documents requiring rework), and stakeholder satisfaction (survey the team before and after). Workflow automation has been shown to increase data accuracy by up to 88%, according to DocuClipper. Compare your baseline numbers from the audit phase to your post-implementation numbers to quantify the impact.
Comments
Join the discussion with an anonymous comment.