
Last verified: August 25, 2026 UTC. Before you paste a registry tweak from an old Windows 11 article, check your build. Press Win+R, type winver, and note the version and OS build. Then open Settings > Personalization and look for a Context menu page. If that page exists and includes the Advanced options toggle, use it first. ElevenForum documents that native page on Experimental 26H2 Insider build 26340.9212, installed with KB5124038 dated August 17, 2026; stable 26H2 availability still needs to be rechecked on the machine in front of you.[1]
That is the whole fork. Builds with the native Context menu setting do not need a registry edit. Builds without it still use the HKCU CLSID method. If you are doing this for more than one Windows profile, treat it as a per-user change, not a machine-wide switch.
| What you see on your PC | Use this fix | Keep this rollback |
|---|---|---|
| Settings > Personalization > Context menu exists, with the Advanced options toggle | Use the Settings toggle. Do not edit the registry first. | Return to the same Settings page and restore the previous toggle state. |
| No Context menu page in Settings | Use the HKCU\Software\Classes\CLSID registry key for your current user. | Delete the HKCU CLSID key you created, then restart Explorer or sign out. |
| You manage multiple users or shared PCs | Deploy the per-user HKCU setting through a user-context method such as Group Policy Preferences or a logon script. | Deploy the matching per-user delete action. Do not assume there is a supported HKLM toggle. |

Check the build before choosing the fix
The right-click menu fix now depends on build state, not just personal preference. The old registry method still works on many Windows 11 systems, but it is no longer the cleanest answer on builds where Microsoft exposes the same behavior in Settings. That matters because the thing you are changing sits directly in daily file handling: PDFs in Downloads, Markdown files in a notes folder, screenshots, zip archives, project folders, and anything else you touch through File Explorer.
- Press Win+R.
- Type winver and press Enter.
- Write down the Windows version and OS build.
- Open Settings > Personalization.
- Look for Context menu. If it is there, open it and check for the Advanced options toggle.
Use the page you actually have, not the page a guide assumes you have. Microsoft’s rollout behavior can differ by Insider channel, cumulative update, feature enablement, and region. If the Context menu page is absent, move to the registry path. If it is present, the native path is the lower-risk choice because it is visible, reversible, and does not depend on a hidden CLSID entry.
Path 1: Use the native Context menu setting when it exists
On builds that include the new page, Windows gives you the option administrators and power users should prefer: a normal Settings control. ElevenForum’s August 2026 documentation shows Settings > Personalization > Context menu with an Advanced options toggle that controls the extra “Show more options” layer without asking you to create the classic CLSID registry key by hand.[1]
- Open Settings.
- Go to Personalization > Context menu.
- Change the Advanced options setting so the full context menu opens directly instead of placing “Show more options” between you and the older command set.
- Right-click a normal file in File Explorer and confirm that the command you repeatedly use now appears without the extra click.
- If the menu does not update immediately, restart Explorer or sign out and back in.
The rollback is deliberately boring: return to Settings > Personalization > Context menu and put the Advanced options toggle back where it was. If you are documenting the change for yourself or for a help desk ticket, record the date, the OS build from winver, and the exact toggle state you changed. That small note prevents the usual mess later, where nobody remembers whether a machine is using a supported setting, a user registry key, or both.
Do not assume every Windows 11 26H2 machine has this page just because one Insider build does. As of this check, the specific build and update named in the public documentation are Experimental 26H2 build 26340.9212 and KB5124038 from August 17, 2026.[1] On a stable release machine, the presence of the Settings page is stronger evidence than a version label.
Path 2: Use the HKCU CLSID registry key on builds without the Settings page
If your build has no native Context menu page, the practical fix is still the per-user registry key that has circulated since Windows 11’s 2021 release. How-To Geek documented the method using the CLSID key {86ca1aa0-34aa-4e8b-a509-50c905bae2a2}\InprocServer32 under HKEY_CURRENT_USER and noted the obvious caveat: Microsoft could disable or change the behavior in a future update.[2]
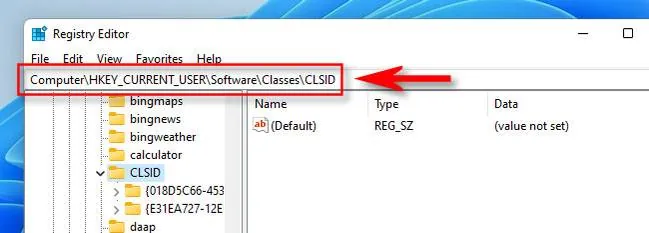
This is an HKCU change. HKCU means HKEY_CURRENT_USER: the signed-in profile only. It is not the same as HKLM, and you should not rewrite the method into HKLM because you want it to feel more global. For one person on one PC, HKCU is exactly where this belongs.
Apply it with a .reg file
Create a text file named something obvious, such as restore-classic-context-menu.reg. Paste this into it:
Windows Registry Editor Version 5.00

[HKEY_CURRENT_USER\Software\Classes\CLSID\{86ca1aa0-34aa-4e8b-a509-50c905bae2a2}\InprocServer32]
@=""
Save the file, double-click it, and accept the Registry Editor prompts. The important detail is the blank default value in InprocServer32. Do not put a space, a fake DLL path, or a comment string there. The value should be blank.
Or apply it from Terminal
If you prefer a command you can paste into Windows Terminal or Command Prompt under the current user, use:
reg.exe add "HKCU\Software\Classes\CLSID\{86ca1aa0-34aa-4e8b-a509-50c905bae2a2}\InprocServer32" /f /veYou do not need an elevated administrator shell for a normal HKCU edit. If a guide tells you to run everything as administrator without explaining why, slow down. Elevation can make it easier to confuse which hive or profile you are changing.
Restart Explorer, then verify the menu
The change usually needs Explorer to reload. The cleanest user-level test is to sign out and sign back in. If you are in the middle of work and can tolerate File Explorer windows closing, restart Explorer instead:
taskkill /f /im explorer.exe
start explorer.exe
Now right-click a file you actually use: a PDF, a Markdown file, an image, a folder, or a zip archive. Do not verify with an empty patch of desktop and call it done. The point of the fix is to remove one extra “Show more options” click from repeated file operations, so test the file types where the old menu was interrupting you.
Rollback for the registry method
Keep the rollback next to the fix. If you used the registry key above and want to restore the default Windows 11 menu behavior, delete the CLSID key you created:
reg.exe delete "HKCU\Software\Classes\CLSID\{86ca1aa0-34aa-4e8b-a509-50c905bae2a2}" /fThen restart Explorer again or sign out and back in. If you prefer a rollback .reg file, use this:
Windows Registry Editor Version 5.00

[-HKEY_CURRENT_USER\Software\Classes\CLSID\{86ca1aa0-34aa-4e8b-a509-50c905bae2a2}]
After major cumulative updates, repeat the verification step. Registry-based UI workarounds are the sort of change that can survive quietly for months and then disappear just as quietly after servicing. That does not make the method useless; it means the method needs a date, a build number, and a rollback.
If you manage more than one user, treat this as per-user work
The classic registry fix lives under HKCU, so it follows the user profile. 4sysops’ deployment write-up centers the same point: the practical enterprise deployment routes are user-context tools such as Group Policy Preferences or PowerShell/logon scripts, while trying to force the change through HKLM runs into ownership and support caveats.[3]
- For a single user: apply the HKCU key while signed in as that user.
- For several users on domain-joined PCs: use a User Configuration Group Policy Preferences registry item, not a Computer Configuration assumption.
- For script-based deployment: run the add command in the user context at logon.
- For rollback: deploy the matching HKCU delete action in the same scope.
- For documentation: record whether a machine uses the native Settings toggle or the HKCU workaround. Mixing both without notes is how support tickets become archaeology.
This is also where downloaded .reg files deserve caution. A convenience file can be fine if you inspect it and it contains only the HKCU path you intended plus the blank default value. It should not become the source of truth. Your own documented command, rollback, target build, and deployment scope are the source of truth.
Why the extra menu exists
The Windows 11 context menu was not changed only to annoy people who right-click files all day. Microsoft’s 2021 developer explanation said the old context menu had grown “in an unregulated environment for 20 years, since Windows XP,” with commands accumulating from apps, shell extensions, and legacy patterns. The same post said commands were not removed entirely, and that Shift+F10 or the keyboard menu key could still load the Windows 10-style menu.[4]
That rationale is reasonable as far as it goes. The old menu could be crowded, inconsistent, and slow. But the rationale does not erase the cost for people whose work is file-heavy. If the command you need sits behind “Show more options” dozens of times a day, the issue is not abstract nostalgia for Windows 10. It is an extra click inserted into a repeated operation.
The keyboard fallback is worth remembering. Shift+F10 and the menu key can be faster than reaching for “Show more options” in some workflows, especially when your hands are already on the keyboard.[4] They are not a replacement for fixing the default right-click behavior if your actual routine starts in File Explorer with a mouse or trackpad.
Do not turn small reports into universal warnings
One kind of bad guidance says the registry key is timeless and harmless. Another kind treats every comment-thread oddity as a known defect. Both are sloppy. For example, there has been community discussion around the “New” entry behaving unexpectedly after the classic menu tweak, but the material available here supports treating that as an unverified community report, not a general Windows 11 failure mode.[3]
The sensible response is not to panic; it is to test the few commands you depend on. After applying either fix, right-click the file types you use, check “Open with,” compression tools, cloud-storage entries, app-specific commands, and “New” if you rely on it. If something important disappears or behaves strangely, use the rollback you saved instead of layering on another tweak.
Where this leaves the Windows 11 right-click fix in Q3 2026
For most non-Insider Windows 11 builds in Q3 2026, the HKCU CLSID key remains the practical way to restore the full right-click menu. For builds that already expose Settings > Personalization > Context menu, the native toggle is the better answer. It is easier to explain, easier to reverse, and less likely to leave a future admin wondering why one profile behaves differently from another.
So the fix is simple only after the build check. Use Settings when your build has the Context menu page. Use HKCU only when it does not. Keep the matching rollback. After a cumulative update or feature update, right-click one real file and confirm the behavior again.
References
- Disable Show more options context menu in Windows 11 — ElevenForum, updated Aug 2026
- How to Get the Old Context Menus Back in Windows 11 — How-To Geek
- Restore classic context menu in Windows 11 Explorer using Group Policy or PowerShell — 4sysops
- Extending the Context Menu and Share Dialog in Windows 11 — Windows Developer Blog, July 19, 2021
Comments
Join the discussion with an anonymous comment.