 Automation Recipe
How to Convert Whiteboard Notes to Text: A Staged AI Workflow for Meeting Notes
A step-by-step guide for knowledge workers and teams who need to digitize spatially organized whiteboard content (sticky notes, diagrams, action items) using a staged AI prompt pipeline. Covers two implementation paths: a low-code n8n + Google Gemini setup and a code-based Azure + GPT-4o option.
By Editorial Team
- handwriting-to-text
- workflow-automation
- meeting-notes
- AI-tools
- step-by-step
Why Whiteboard Notes Need a Different Approach
A whiteboard after a 45-minute brainstorming session is not a linear document. It is a spatial map: sticky notes clustered by theme, action items boxed off on the right, a timeline drawn across the bottom, and arrows connecting related ideas. A standard OCR tool or a single-pass AI prompt treats the entire image as a flat block of text, which means it will read the sticky note in the top-left corner, then jump to the diagram in the center, then grab the action items — all in sequence, with no awareness that those items belong to different sections.
This is the fundamental problem that a staged prompt pipeline solves. Instead of asking an AI model to perform one task — "transcribe this image" — you break the work into three distinct stages: detect the note type, process the spatial layout, and post-process the output into structured sections. Each stage uses a different prompt tailored to a specific cognitive task, which produces far more usable results than a single OCR pass.
The Staged Prompt Pipeline: How It Works
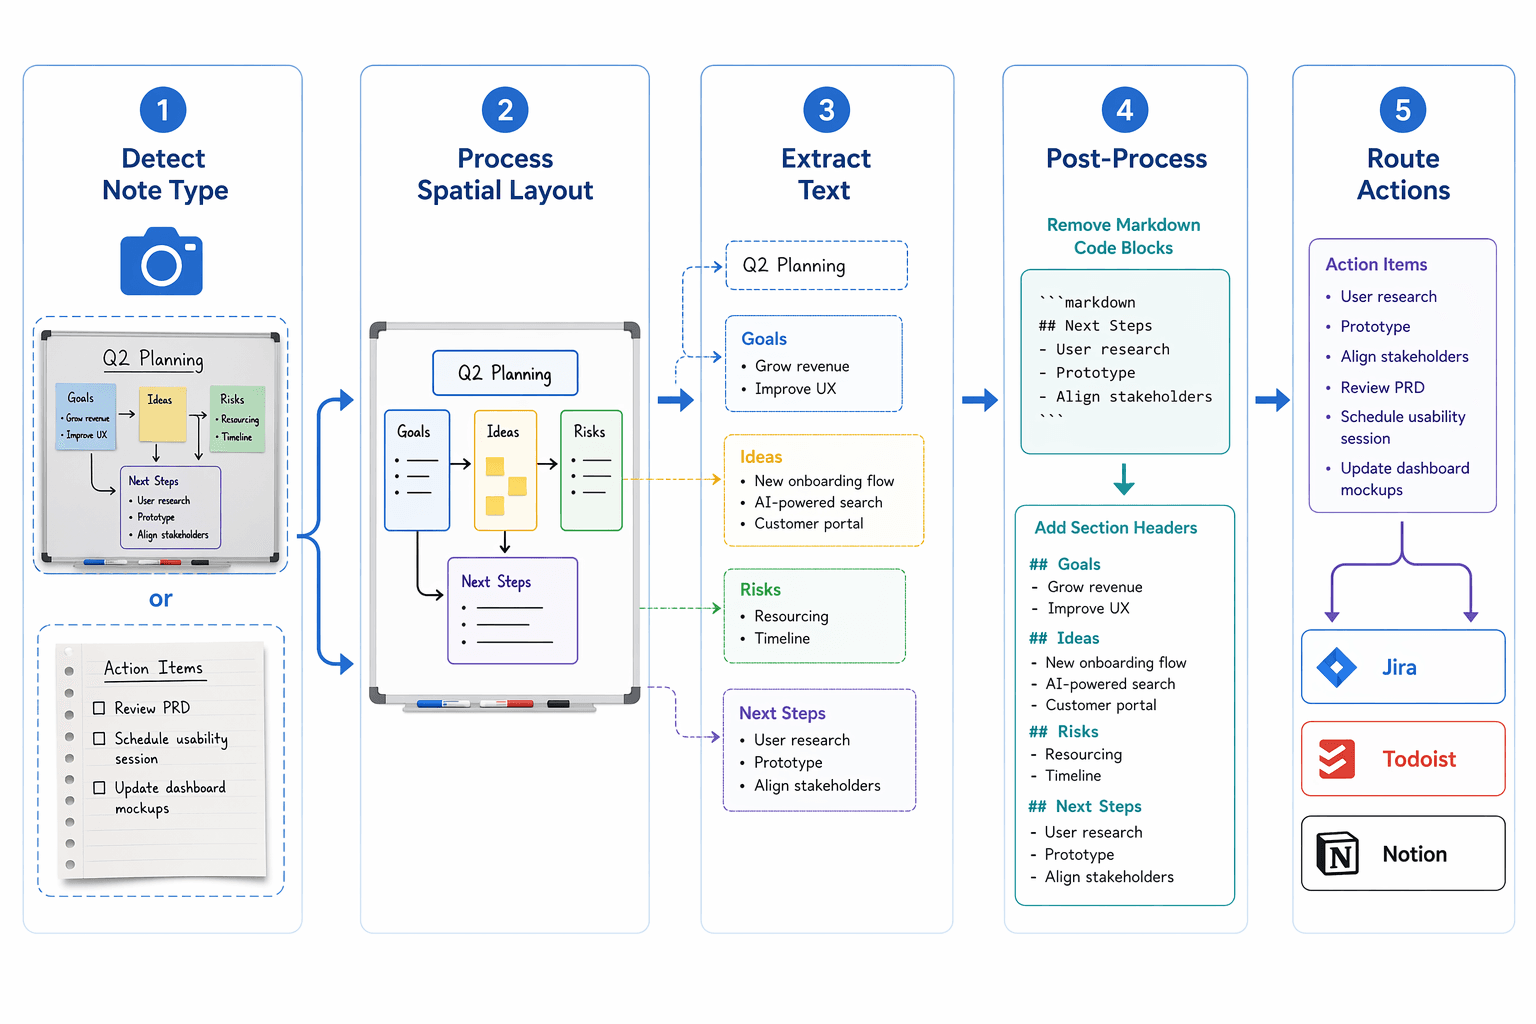
The pipeline consists of three sequential stages. Each stage sends the same image to the AI model but with a different instruction set. The output of each stage feeds into the next.
Stage 1: Detect Note Type
The first prompt asks the model to classify the image into one of three categories: whiteboard (spatially organized with sticky notes, diagrams, or boxed sections), paper notes (linear handwriting on a notebook page), or generic (unknown or mixed). This classification determines which prompt template the pipeline uses in Stage 2. A whiteboard image triggers the spatial-layout prompt; a paper note triggers a linear transcription prompt.
Stage 2: Process Spatial Layout and Extract Text
For whiteboard-classified images, the second prompt instructs the model to identify distinct spatial zones — sticky-note clusters, boxed sections, diagrams with labels, and free-form text areas — and extract text from each zone separately. The model is told to preserve the spatial relationships: "The top-left cluster contains three sticky notes about Q3 goals. The right-side box contains action items." This stage produces a raw output that includes markdown formatting, code blocks, and sometimes hallucinated section headers.
Stage 3: Post-Process and Structure
The third stage takes the raw output from Stage 2 and performs cleanup: removing markdown code block artifacts, replacing guessed section headers with consistent formatting, merging duplicate entries, and generating a clean document with clear section headings (Action Items, Decisions, Open Questions, Timeline). This stage also identifies any text that appears to be an action item or owner assignment and formats it consistently.
Option A: Low-Code Setup with n8n and Google Gemini
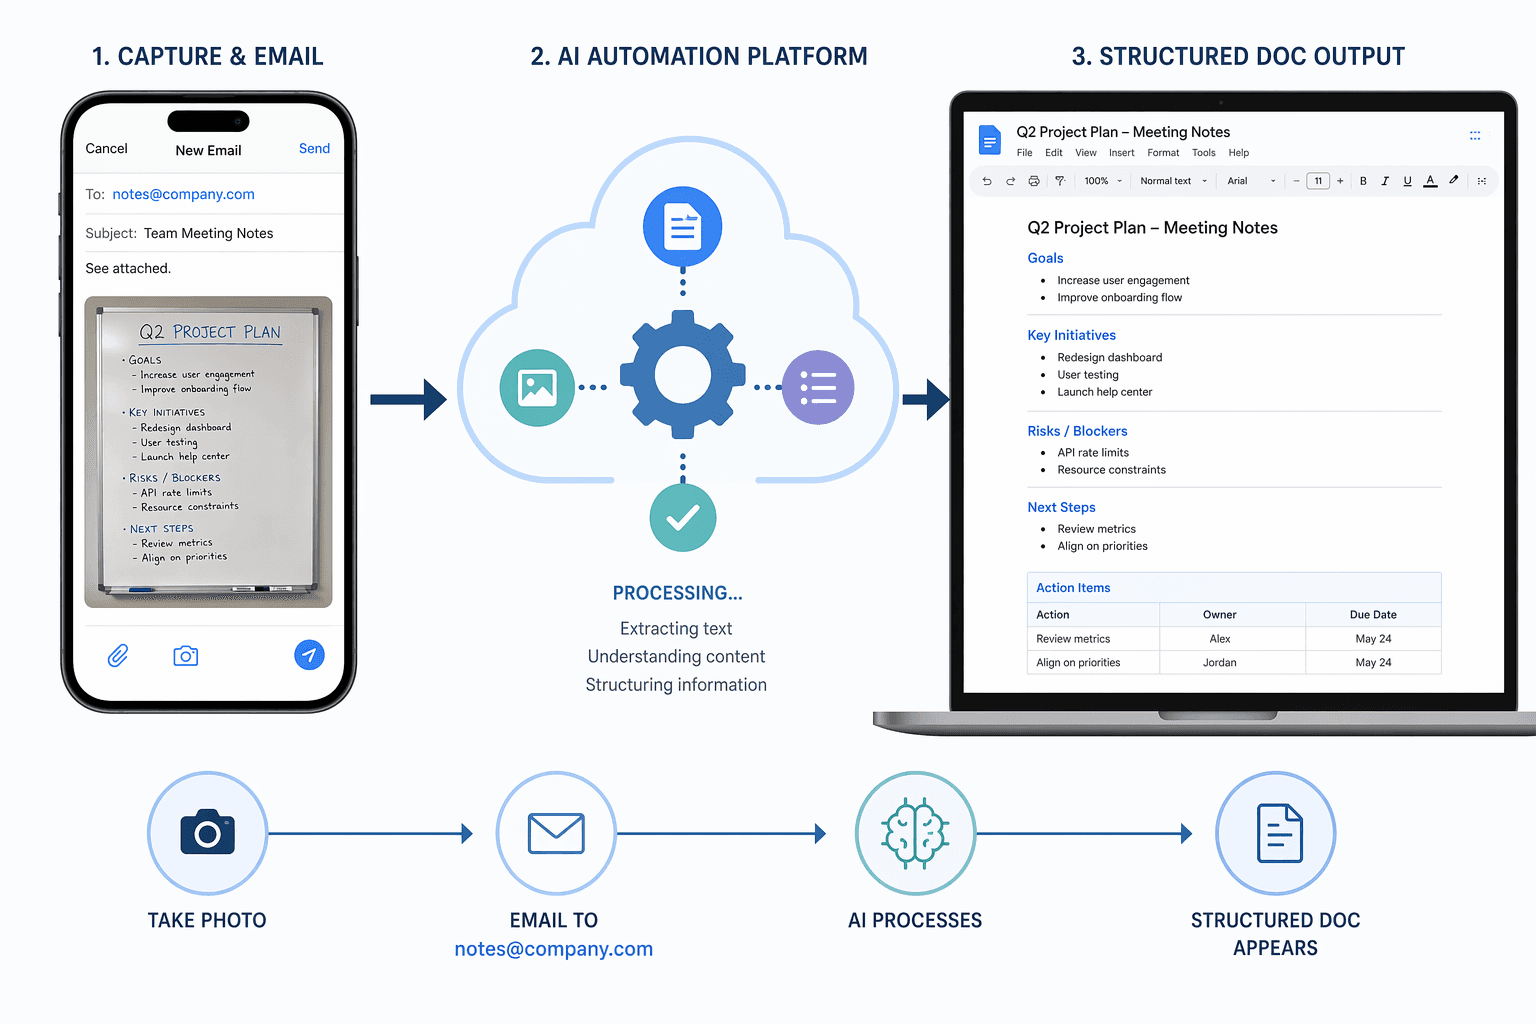
This option is designed for teams that want a working system without writing code. The workflow uses n8n (self-hosted or cloud) as the automation backbone, Google Gemini 2.5 Pro as the AI model, and a dedicated email inbox as the trigger. When a team member sends a photo to [email protected], the workflow processes it and outputs a structured Google Doc.
Prerequisites
- An n8n instance (self-hosted via Docker or n8n.cloud account)
- A Google Cloud project with the Gmail API and Google Docs API enabled
- A Google Gemini API key (Gemini 2.5 Pro recommended for handwriting and spatial layout)
- A dedicated Gmail address (e.g., [email protected]) for photo submissions
Workflow Steps
- Set up the email trigger: Configure an n8n Gmail trigger node to watch the dedicated inbox for new emails with image attachments. Filter by subject line (e.g., "whiteboard notes") or sender domain to reduce noise.
- Extract and prepare the image: Use an n8n Extract from File node or the easybits Extractor community node to pull the image attachment from the email and convert it to a base64 string for API submission.
- Stage 1 — Detect note type: Send the image to Gemini 2.5 Pro with a prompt that asks: "Classify this image as 'whiteboard', 'paper', or 'generic'. Respond with only one word." Store the classification in a workflow variable.
- Stage 2 — Process layout: Based on the classification, send the image to Gemini with the appropriate prompt template. For whiteboard images, use: "This is a whiteboard photo. Identify distinct spatial zones (sticky notes, boxed sections, diagrams, free text). Extract all text from each zone and describe the spatial relationship between zones. Output in markdown."
- Stage 3 — Post-process: Send the raw markdown output to Gemini with a cleanup prompt: "Remove all markdown code block markers. Reorganize the content into sections: Action Items, Decisions, Open Questions, Notes. Generate consistent section headers. Remove duplicate entries. Output as plain text with markdown headers."
- Create the Google Doc: Use the Google Docs node in n8n to create a new document with the processed text. Set the document title to include the date and sender name (e.g., "Whiteboard Notes — 2026-06-17 — Sarah Chen"). Share the document link back to the sender via email.
Option B: Code-Based Setup with Azure and GPT-4o
For teams that need more control over the pipeline — custom post-processing logic, integration with internal APIs, or higher throughput — a code-based setup using Azure services offers greater flexibility. This option uses Azure Logic Apps for the workflow trigger, Azure Functions (Python) for the staged prompt logic, and Azure OpenAI GPT-4o as the AI model.
Prerequisites
- An Azure subscription with access to Azure OpenAI Service (GPT-4o deployment)
- Azure Functions runtime (Python 3.11+) for the staged prompt logic
- Azure Logic Apps (Standard plan recommended for stateful workflows)
- An Office 365 or Outlook.com email account for the email trigger
Architecture Overview
The Azure Logic App listens for new emails in a dedicated inbox. When an email with an image attachment arrives, the Logic App triggers an Azure Function that runs the three-stage prompt pipeline. The function returns the processed text, and the Logic App writes it to a OneNote page or SharePoint document library.
Python Function Skeleton
import azure.functions as func
import openai
import base64
import json

# Configure Azure OpenAI client
openai.api_type = "azure"
openai.api_base = "https://your-resource.openai.azure.com/"
openai.api_version = "2024-02-15-preview"
openai.api_key = "your-api-key"

def main(req: func.HttpRequest) -> func.HttpResponse:
    req_body = req.get_json()
    image_base64 = req_body.get('image')

    # Stage 1: Detect note type
    stage1_prompt = "Classify this image as 'whiteboard', 'paper', or 'generic'. Respond with only one word."
    note_type = call_gpt4o(stage1_prompt, image_base64)

    # Stage 2: Process layout based on type
    if note_type == "whiteboard":
        stage2_prompt = "This is a whiteboard photo. Identify distinct spatial zones..."
    else:
        stage2_prompt = "Transcribe all handwritten text in this image linearly."
    raw_output = call_gpt4o(stage2_prompt, image_base64)

    # Stage 3: Post-process
    stage3_prompt = f"Clean up this raw transcription: {raw_output}\n\nRemove markdown code blocks, organize into sections..."
    final_output = call_gpt4o(stage3_prompt, image_base64)

    return func.HttpResponse(final_output, status_code=200)

def call_gpt4o(prompt: str, image_base64: str) -> str:
    response = openai.ChatCompletion.create(
        engine="gpt-4o",
        messages=[
            {"role": "system", "content": "You are a handwriting and spatial layout analysis assistant."},
            {"role": "user", "content": [
                {"type": "text", "text": prompt},
                {"type": "image_url", "image_url": {"url": f"data:image/jpeg;base64,{image_base64}"}}
            ]}
        ],
        max_tokens=2000
    )
return response.choices[0].message.contentRouting Action Items to Your Project Management Tools
The real value of digitizing whiteboard notes is not the transcription itself — it is the action items, decisions, and owner assignments that get lost when a photo sits in a camera roll. Both workflow options can be extended to extract these structured elements and route them to the tools your team already uses.
After Stage 3 produces the cleaned document, add a fourth prompt that asks the model to extract all action items in a structured format: "Extract all action items from this document. For each item, output: Owner (if specified), Task description, Due date (if specified), and Priority (if specified). Output as a JSON array." This structured output can then be sent via webhook or API call to your project management tool.
| Destination Tool | Integration Method | Example Use Case |
|---|---|---|
| Notion | Notion API via n8n HTTP node | Create a new database entry in a "Meeting Actions" database with owner, task, and due date properties |
| Jira | Jira REST API via Azure Logic Apps HTTP connector | Create a new issue in a specified project with the action item as the summary and the whiteboard photo URL as an attachment |
| Todoist | Todoist REST API via n8n Todoist node | Add each action item as a new task in the "Inbox" project with the due date parsed from the whiteboard |
| Google Docs | Google Docs API (already used in Option A) | Append action items to a running "Weekly Action Items" document with date stamps |
| Microsoft To Do | Microsoft Graph API via Azure Logic Apps | Create tasks in a shared "Team Whiteboard Actions" list with owner names in the task title |
Real-World Accuracy and Limitations
The staged pipeline handles certain whiteboard scenarios well and struggles with others. Understanding these boundaries will help you set realistic expectations and design your workflow to compensate for known weaknesses.
What the Pipeline Handles Well
- Spatial layout with sticky notes: GPT-4o and Gemini 2.5 Pro can reliably identify clusters of sticky notes and extract text from each one, even when handwriting is small or angled.
- Boxed sections and headers: Content enclosed in drawn boxes (e.g., "Action Items" in a rectangle) is consistently recognized as a distinct section with a header.
- Mixed handwriting styles: Both models handle multiple handwriting styles on the same whiteboard, as long as the text is legible to a human reader.
- Arrow connections: Simple arrows connecting two boxes are often interpreted correctly, though the model may describe the relationship in text rather than preserving it as a visual link.
Where It Struggles
- Complex diagrams: Flowcharts with multiple branching paths, decision diamonds, and parallel processes are often flattened into a linear description that loses the diagram's logic.
- Poor lighting and glare: Photos taken at an angle or with overhead light glare cause the model to miss text in affected areas. A straight-on photo with even lighting dramatically improves accuracy.
- Dense text blocks: A whiteboard filled edge-to-edge with small handwriting produces more hallucinated text and duplicate entries. The post-processing stage helps, but accuracy drops noticeably beyond approximately 200 words per image.
- Overlapping sticky notes: When sticky notes overlap or are placed at extreme angles, the model may read two notes as one or miss text entirely.
Cost Comparison: n8n vs. Azure
The ongoing cost of running either pipeline depends on three factors: AI model API usage, hosting infrastructure, and any third-party service limits. The table below compares the two options for a team processing 50 whiteboard photos per month.
| Cost Category | n8n + Gemini (Option A) | Azure + GPT-4o (Option B) |
|---|---|---|
| AI API cost (50 images/month) | Gemini 2.5 Pro: ~$2.50 (pay-as-you-go, $0.05 per image) | GPT-4o: ~$15.00 (pay-as-you-go, $0.30 per image) |
| Hosting infrastructure | n8n.cloud: $20/month (starter plan) or self-hosted Docker: $0 (your own server) | Azure consumption tier: ~$5–10/month for Logic Apps + Functions (low volume) |
| Third-party limits | easybits Extractor: 50 free extractions/month (may need paid tier above that) | No equivalent limit; Azure Functions handles image extraction natively |
| Total estimated monthly cost | $2.50–22.50 (depends on hosting choice) | $20.00–25.00 |
| Setup complexity | Low — visual workflow builder, no code required | Medium-High — requires Python development and Azure resource configuration |
Team Adoption Strategy: Making It a Habit
Building the automation pipeline is the technical half of the solution. The other half — getting your team to actually use it — is often harder. A workflow that requires three steps and a login page will be abandoned after the first week. The email-based trigger in both options is designed to minimize friction: the only action a team member needs to take is take a photo and send it to a known email address.
Setting Up the Submission Channel
Create a dedicated email address such as [email protected]. Configure it to accept emails from anyone in your organization. No subject line formatting is required — the workflow can parse the sender, timestamp, and any text in the email body. This means a team member can take a photo of the whiteboard after a meeting, type a quick note like "Q3 planning session" in the subject line, and hit send. The structured document appears in the shared drive within 60–90 seconds.
Creating a Simple Photo-Taking Guide
The most common failure point is poor photo quality. Create a one-page guide (physical or digital) with three rules:
- Stand directly in front of the whiteboard, not at an angle. Angled photos cause text distortion and missed content.
- Ensure even lighting. Turn off overhead lights that cast shadows and avoid positioning yourself between the board and a window.
- Capture the full board in one frame if possible. For large boards, take two overlapping photos and send them in separate emails with a note like "Board — left half" and "Board — right half."
Establishing a Review Cadence
AI-generated transcriptions are not perfect. Schedule a brief review step — either a 10-minute slot at the end of each meeting or a weekly review of all processed whiteboard notes. During review, a designated team member (often the meeting facilitator or a project manager) opens the generated document, corrects any transcription errors, and confirms that action items have been routed to the correct project management tool. This review step also serves as a feedback loop: if the pipeline consistently misreads certain handwriting styles or whiteboard layouts, you can adjust the prompts in Stage 2 to improve accuracy.
Comments
Join the discussion with an anonymous comment.